vue开发单页应用怎么做免登录?

可以尝试 Authing 的 Guard 组件,里面可以设置自动登录或几天内无需登录,加入登录状态判断就可以实现登录后才使用某个功能。
Guard 是 Authing 提供的一种轻便的认证组件,你可以把它嵌入在你任何的单页应用中,一站式处理复杂的用户认证流程。
01
创建应用
首先,你需要将你的应用接入 Authing 控制台。如果你还没有创建,请先**在 Authing 控制台创建一个应用**。
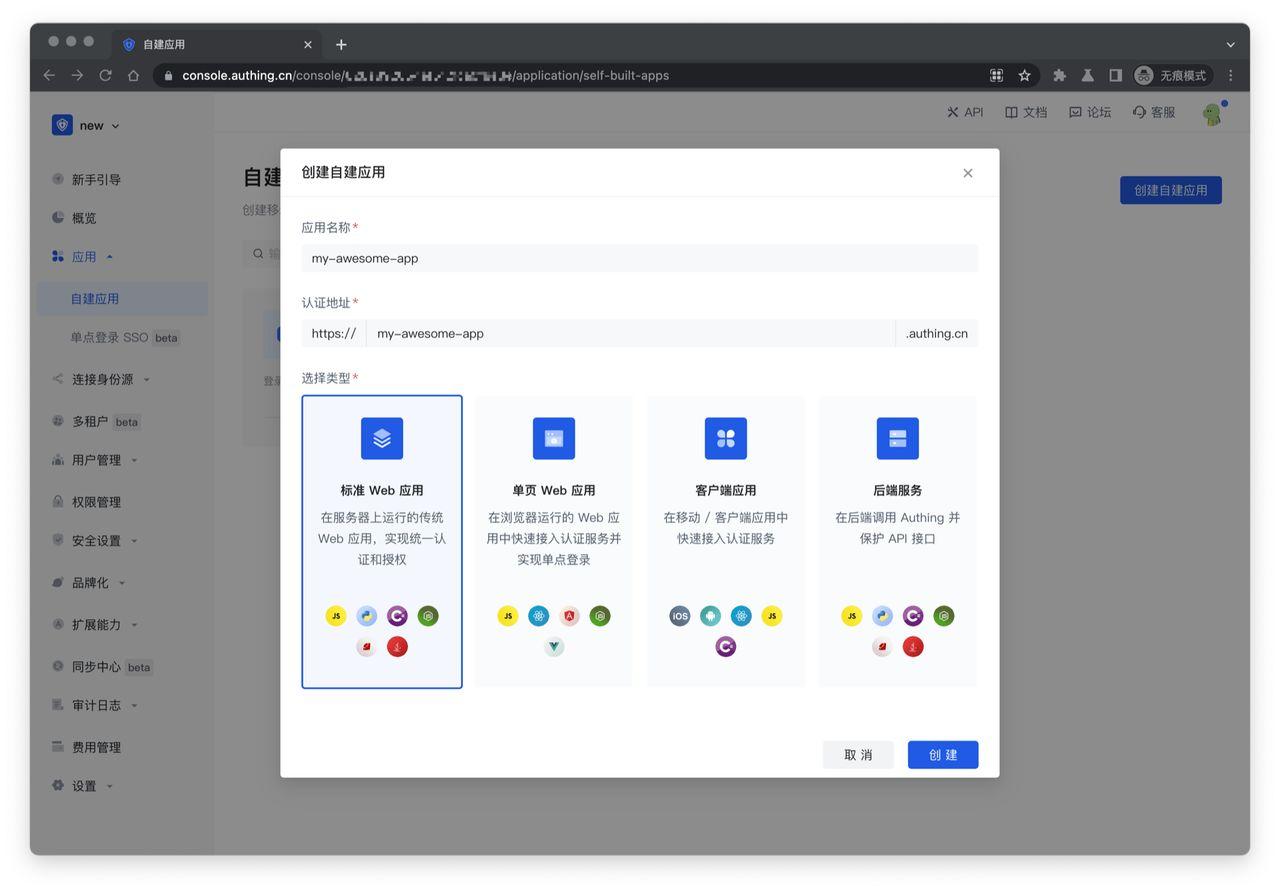
在 Authing 控制台左侧导航进入「自建应用」功能区,点击右上角的创建自建应用按钮,填入以下信息:
-
应用名称: 你的应用名称;
-
认证地址: 选择一个二级域名,必须为合法的域名格式,例如
my-awesome-app;

02
安装与初始化
有两种方式可以供你选择:「安装 Authing library」 或 「直接通过浏览器加载」。
无论使用哪一种安装方式,你都需要用到应用的 appId ,请先**前往控制台获取**。
方法一:安装 Authing library
首先,通过 npm/yarn/cnpm 安装 Authing library。
推荐使用 npm (稳定版本 v3.1.10)或 yarn,它们能更好的和 webpack 打包工具进行配合,也可放心地在生产环境打包部署使用,享受整个生态圈和工具链带来的诸多好处。 如果你的网络环境不佳,也可使用 cnpm 。
运行下列命令行安装 Authing Vue.JS library:
$ yarn add @authing/vue-ui-components

# OR

$ npm install @authing/vue-ui-components --save
然后,在你的 Vue 应用中完成配置:
<template>
  <Guard :appId="appId" @login="onLogin"></Guard>
</template>

<script>
import { Guard } from "@authing/vue-ui-components";

// 引入 CSS 样式
import "@authing/vue-ui-components/lib/index.min.css";

export default {
  components: {
    Guard,
  },
  data: () => ({
    // 替换你的 AppId
    appId: "your_appId_at_authing_console",
  }),
  methods: {
    onLogin(userInfo) {
      console.log(userInfo);
    },
  },
};
</script>
如果您的项目中使用了 vue-router,请在使用 guard 时指定挂载节点
<template>
  <div id="guard">
    <Guard :appId="appId" @login="onLogin" :config="config"></Guard>
  </div>
</template>

<script>
import { Guard } from "@authing/vue-ui-components";

// 引入 CSS 样式
import "@authing/vue-ui-components/lib/index.min.css";

export default {
  components: {
    Guard,
  },
  data: () => ({
    // 替换你的 AppId
    appId: "your_appId_at_authing_console",
    config: {
      target: "#guard", //指定挂载节点
    },
  }),
  methods: {
    onLogin(userInfo) {
      console.log(userInfo);
    },
  },
};
</script>
方法二:直接通过浏览器加载
首先,在你的 HTML 文件中使用 script 和 link 标签直接引入文件,并使用全局变量 AuthingVueUIComponents。
Authing npm 发布包内的 @authing/vue-components/lib 目录下提供了 index.min.css 以及 index.min.js,你可以直接调用,也可以通过 jsdelivr 或者 unpkg 下载。
<head>
    <meta charset="utf-8" />
    <!-- 引入 Vue -->
    <script src="https://cdn.jsdelivr.net/npm/vue@2.6.12/dist/vue.js"></script>

    <script src="https://cdn.jsdelivr.net/npm/@authing/vue-ui-components/lib/index.min.js"></script>

    <!-- 引入样式 -->
    <link rel="stylesheet" href="https://cdn.jsdelivr.net/npm/@authing/vue-ui-components/lib/index.min.css">
    </link>
</head>

<body>
    <div id="app"></div>

    <script>
        // 这可以替换你的 AppId
        const appId = 'your_appId_at_authing_console'

        const app = new Vue({
            el: '#app',
            render: (h) => h(AuthingVueUIComponents.Guard, {
                props: {
                    appId,
                },
            }),
        })

        window.app = app

    </script>
</body>

</html>
无论通过哪一种方式,你都可以完成 Authing Guard 在你项目中的安装和初始化。
接下来,你可以根据实际的需要,直接阅读对应的使用指南和代码示例。
03
使用 Authing Guard
登录并获取用户信息
用户在登录成功后会触发 onLogin 事件,并且在事件中会返回用户的详细信息。onLogin 具体的使用方法如下:
<template>
  <Guard :appId="appId" @login="onLogin"></Guard>
</template>

<script>
import { Guard } from "@authing/vue-ui-components";

// 引入 CSS 样式
import "@authing/vue-ui-components/lib/index.min.css";

export default {
  components: {
    Guard,
  },
  data: () => ({
    // 替换你的 AppId
    appId: "your_appId_at_authing_console",
  }),
  methods: {
    onLogin(userInfo) {
      console.log(userInfo);
    },
  },
};
</script>
判断用户登录状态
用户登录成功后,在二次会话的时候,我们之前已经将 token 进行了缓存。在判断用户登录状态时,首先需要对这个 token 进行登录状态校验,校验成功后在进行用户详细信息的获取。 你可以使用 authClient 中的 checkLoginStatus 方法检测 token 登录状态。下方代码是优先检测登录态,如果用户处于登录态,则显示用户的头像。
<template>
  <img v-if="user !== null" :src="user.photo" alt="user" class="btn" />
  <div v-else class="btn" @click="showGuard">登录</div>
  <Guard
    :authClient="authClient"
    :visible="visible"
    :config="config"
    @login="onLogin"
    @close="onClose"
  ></Guard>
</template>

<script>
import { Guard } from "@authing/vue-ui-components";
import { AuthenticationClient } from "authing-js-sdk";

// 引入 CSS 样式
import "@authing/vue-ui-components/lib/index.min.css";

const authClient = new AuthenticationClient({
  // 替换你的 AppId
  appId: "your_appId_at_authing_console",
});

export default {
  components: {
    Guard,
  },
  data: () => ({
    config: {
      mode: "modal",
    },
    visible: false,
    user: null,
  }),
  computed: {
    authClient() {
      return authClient;
    },
  },
  created() {
    this.checkLoginStatus();
  },
  methods: {
    onLogin(userInfo) {
      console.log(userInfo);
      this.user = userInfo;

      this.onClose();
    },
    showGuard() {
      this.visible = true;
    },
    onClose() {
      this.visible = false;
    },
    async checkLoginStatus() {
      // authClient 登录成功时 会将用户相关信息存储在 localStorage 中
      const user = await authClient.getCurrentUser();

      if (user.token) {
        const { status } = await authClient.checkLoginStatus(user.token);

        if (status) {
          this.user = user;
        }
      }
    },
  },
};
</script>

<style>
.btn {
  width: 100px;
  height: 100px;
  border-radius: 50%;
  display: flex;
  align-items: center;
  justify-content: center;
  border: 1px solid #ccc;
  cursor: pointer;
}
</style>
退出登录
你可以使用 authClient 中的 logout 方法完成退出登录的操作:
<template>
  <template v-if="user !== null">
    <img :src="user.photo" alt="user" class="btn" />
    <p
      style="width: 100px; text-align: center; cursor: pointer"
      @click="onLogout"
    >
      退出登录
    </p>
  </template>
  <div v-else class="btn" @click="showGuard">登录</div>
  <Guard
    :authClient="authClient"
    :visible="visible"
    :config="config"
    @login="onLogin"
    @close="onClose"
  ></Guard>
</template>

<script>
import { Guard } from "@authing/vue-ui-components";
import { AuthenticationClient } from "authing-js-sdk";

// 引入 CSS 样式
import "@authing/vue-ui-components/lib/index.min.css";

const authClient = new AuthenticationClient({
  // 替换你的 AppId
  appId: "your_appId_at_authing_console",
});

export default {
  components: {
    Guard,
  },
  data: () => ({
    config: {
      mode: "modal",
    },
    visible: false,
    user: null,
  }),
  computed: {
    authClient() {
      return authClient;
    },
  },
  created() {
    this.checkLoginStatus();
  },
  methods: {
    onLogin(userInfo) {
      console.log(userInfo);
      this.user = userInfo;

      this.onClose();
    },
    showGuard() {
      this.visible = true;
    },
    onClose() {
      this.visible = false;
    },
    async onLogout() {
      await authClient.logout();

      this.user = null;
    },
    async checkLoginStatus() {
      // authClient 登录成功时 会将用户相关信息存储在 localStorage 中
      const user = await authClient.getCurrentUser();

      if (user.token) {
        const { status } = await authClient.checkLoginStatus(user.token);

        if (status) {
          this.user = user;
        }
      }
    },
  },
};
</script>

<style>
.btn {
  width: 100px;
  height: 100px;
  border-radius: 50%;
  display: flex;
  align-items: center;
  justify-content: center;
  border: 1px solid #ccc;
  cursor: pointer;
}
</style>
点击此处了解更多行业身份管理
「解决方案」以及「最佳实践案例」
更多推荐
 已为社区贡献1303条内容


所有评论(0)