
Spring boot+Spring security+JWT实现前后端分离登录认证及权限控制
借鉴文章:Springboot + Spring Security 实现前后端分离登录认证及权限控制_I_am_Rick_Hu的博客-CSDN博客_springsecurity前后端分离登录认证最近一段时间,公司给我安排了一个公司子系统的后台管理系统,让我实现权限管理。此时我就考虑到Spring全家桶的Spring security来权限管理。Spring security大致分为认证和授权两个功
借鉴文章:
Springboot + Spring Security 实现前后端分离登录认证及权限控制_I_am_Rick_Hu的博客-CSDN博客_springsecurity前后端分离登录认证
最近一段时间,公司给我安排了一个公司子系统的后台管理系统,让我实现权限管理。此时我就考虑到Spring全家桶的Spring security来权限管理。Spring security大致分为认证和授权两个功能,底层也是通过JavaWeb的Filter过滤器来实现,在Spring security中维护了一个过滤器链用来一层的一层的做过滤实现认证和授权,这里就不过多的介绍了,下面用案例来介绍。
项目前的准备:
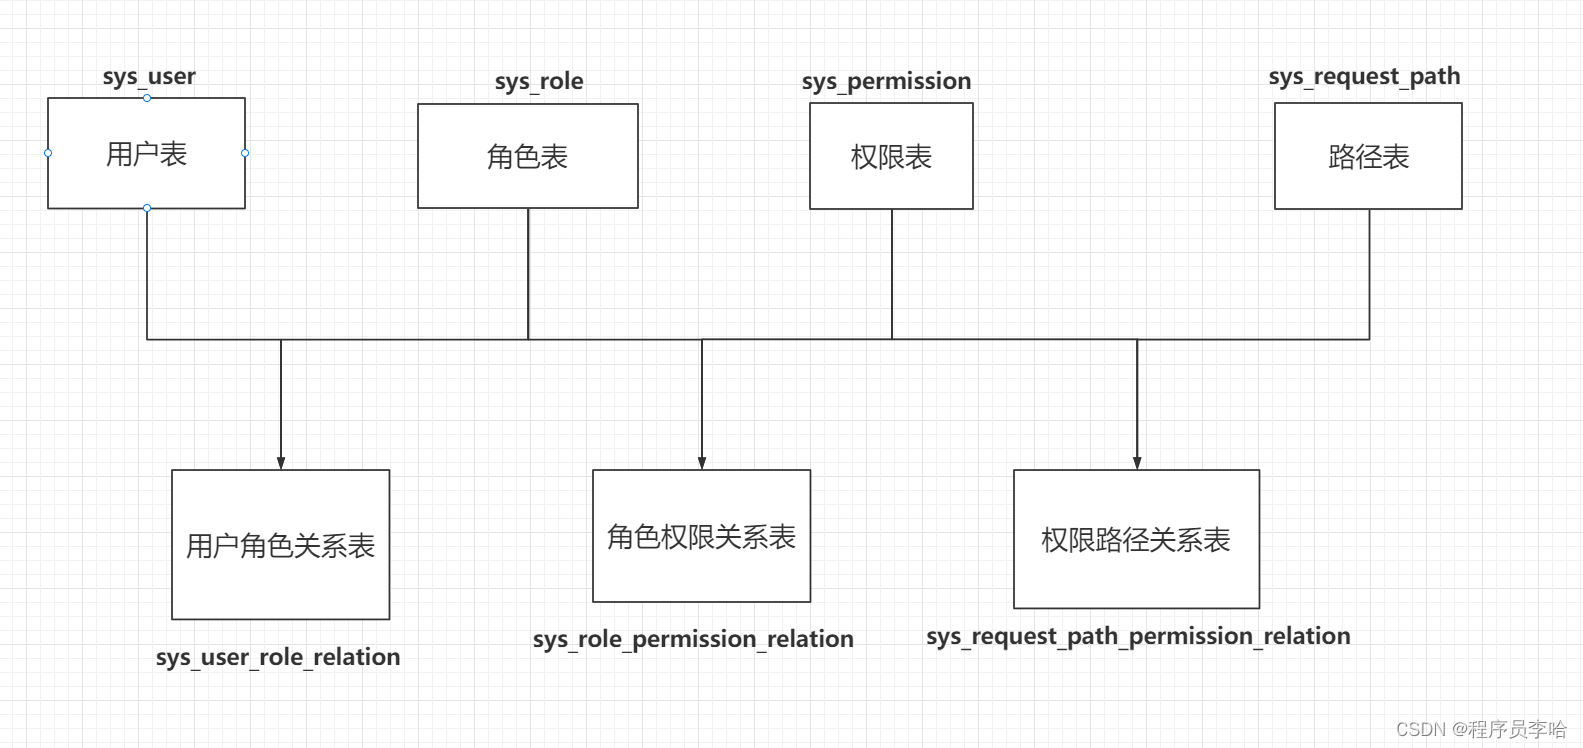
整体架构为Spring boot+Spring security+Mybatis-plus+jwt。整体项目的结构如下:

整个项目依赖如下:
 <parent>
        <artifactId>spring-boot-starter-parent</artifactId>
        <groupId>org.springframework.boot</groupId>
        <version>2.2.1.RELEASE</version>
    </parent>


    <dependencies>
        <dependency>
            <groupId>org.springframework.boot</groupId>
            <artifactId>spring-boot-starter-web</artifactId>
        </dependency>

        <dependency>
            <groupId>org.springframework.boot</groupId>
            <artifactId>spring-boot-starter-test</artifactId>
            <scope>test</scope>
        </dependency>

        <dependency>
            <groupId>org.springframework.boot</groupId>
            <artifactId>spring-boot-starter-security</artifactId>
        </dependency>

        <dependency>
            <groupId>com.baomidou</groupId>
            <artifactId>mybatis-plus-boot-starter</artifactId>
            <version>3.0.5</version>
        </dependency>

        <dependency>
            <groupId>mysql</groupId>
            <artifactId>mysql-connector-java</artifactId>
        </dependency>

        <dependency>
            <groupId>com.alibaba</groupId>
            <artifactId>druid-spring-boot-starter</artifactId>
            <version>1.1.13</version>
        </dependency>

        <dependency>
            <groupId>org.projectlombok</groupId>
            <artifactId>lombok</artifactId>
        </dependency>

        <!--JSON-->
        <dependency>
            <groupId>com.alibaba</groupId>
            <artifactId>fastjson</artifactId>
            <version>1.2.76</version>
        </dependency>
        <dependency>
            <groupId>org.apache.commons</groupId>
            <artifactId>commons-lang3</artifactId>
            <version>3.8.1</version>
        </dependency>

        <dependency>
            <groupId>com.baomidou</groupId>
            <artifactId>mybatis-plus-generator</artifactId>
            <version>3.4.1</version>
        </dependency>

        <dependency>
            <groupId>org.apache.velocity</groupId>
            <artifactId>velocity-engine-core</artifactId>
            <version>2.1</version>
        </dependency>

        <!-- JWT-->
        <dependency>
            <groupId>io.jsonwebtoken</groupId>
            <artifactId>jjwt</artifactId>
            <version>0.9.0</version>
        </dependency>
    </dependencies>


    <build>
        <resources>
            <resource>
                <directory>src/main/java</directory>
                <includes>
                    <include>**/*.xml</include>
                </includes>
            </resource>
        </resources>
    </build>
数据库的脚本如下:
大家可以去Mybatis-Plus官网copy到逆向生成的代码,链接如下
记得要加上逆向生成的依赖哦,笔者提供的maven依赖中没有写。

SET NAMES utf8mb4;
SET FOREIGN_KEY_CHECKS = 0;

-- ----------------------------
-- Table structure for sys_permission
-- ----------------------------
DROP TABLE IF EXISTS `sys_permission`;
CREATE TABLE `sys_permission`  (
  `id` int(11) NOT NULL AUTO_INCREMENT COMMENT '主键id',
  `permission_code` varchar(32) CHARACTER SET utf8 COLLATE utf8_general_ci NULL DEFAULT NULL COMMENT '权限code',
  `permission_name` varchar(32) CHARACTER SET utf8 COLLATE utf8_general_ci NULL DEFAULT NULL COMMENT '权限名',
  PRIMARY KEY (`id`) USING BTREE
) ENGINE = InnoDB AUTO_INCREMENT = 5 CHARACTER SET = utf8 COLLATE = utf8_general_ci COMMENT = '权限表' ROW_FORMAT = Compact;

-- ----------------------------
-- Records of sys_permission
-- ----------------------------
INSERT INTO `sys_permission` VALUES (1, 'create_user', '创建用户');
INSERT INTO `sys_permission` VALUES (2, 'query_user', '查看用户');
INSERT INTO `sys_permission` VALUES (3, 'delete_user', '删除用户');
INSERT INTO `sys_permission` VALUES (4, 'modify_user', '修改用户');

-- ----------------------------
-- Table structure for sys_request_path
-- ----------------------------
DROP TABLE IF EXISTS `sys_request_path`;
CREATE TABLE `sys_request_path`  (
  `id` int(11) NOT NULL AUTO_INCREMENT COMMENT '主键id',
  `url` varchar(64) CHARACTER SET utf8 COLLATE utf8_general_ci NOT NULL COMMENT '请求路径',
  `description` varchar(128) CHARACTER SET utf8 COLLATE utf8_general_ci NULL DEFAULT NULL COMMENT '路径描述',
  PRIMARY KEY (`id`) USING BTREE
) ENGINE = InnoDB AUTO_INCREMENT = 3 CHARACTER SET = utf8 COLLATE = utf8_general_ci COMMENT = '请求路径' ROW_FORMAT = Compact;

-- ----------------------------
-- Records of sys_request_path
-- ----------------------------
INSERT INTO `sys_request_path` VALUES (1, '/getUser', '查询用户');
INSERT INTO `sys_request_path` VALUES (2, '/deleteUser', '删除用户');

-- ----------------------------
-- Table structure for sys_request_path_permission_relation
-- ----------------------------
DROP TABLE IF EXISTS `sys_request_path_permission_relation`;
CREATE TABLE `sys_request_path_permission_relation`  (
  `id` int(11) NULL DEFAULT NULL COMMENT '主键id',
  `url_id` int(11) NULL DEFAULT NULL COMMENT '请求路径id',
  `permission_id` int(11) NULL DEFAULT NULL COMMENT '权限id'
) ENGINE = InnoDB CHARACTER SET = utf8 COLLATE = utf8_general_ci COMMENT = '路径权限关联表' ROW_FORMAT = Compact;

-- ----------------------------
-- Records of sys_request_path_permission_relation
-- ----------------------------
INSERT INTO `sys_request_path_permission_relation` VALUES (1, 1, 2);
INSERT INTO `sys_request_path_permission_relation` VALUES (2, 2, 3);

-- ----------------------------
-- Table structure for sys_role
-- ----------------------------
DROP TABLE IF EXISTS `sys_role`;
CREATE TABLE `sys_role`  (
  `id` int(11) NOT NULL AUTO_INCREMENT COMMENT '主键id',
  `role_code` varchar(255) CHARACTER SET utf8 COLLATE utf8_general_ci NULL DEFAULT NULL COMMENT '角色值',
  `role_name` varchar(32) CHARACTER SET utf8 COLLATE utf8_general_ci NULL DEFAULT NULL COMMENT '角色名',
  `role_description` varchar(64) CHARACTER SET utf8 COLLATE utf8_general_ci NULL DEFAULT NULL COMMENT '角色说明',
  PRIMARY KEY (`id`) USING BTREE
) ENGINE = InnoDB AUTO_INCREMENT = 3 CHARACTER SET = utf8 COLLATE = utf8_general_ci COMMENT = '用户角色表' ROW_FORMAT = Compact;

-- ----------------------------
-- Records of sys_role
-- ----------------------------
INSERT INTO `sys_role` VALUES (1, 'admin', '管理员', '管理员,拥有所有权限');
INSERT INTO `sys_role` VALUES (2, 'user', '普通用户', '普通用户,拥有部分权限');

-- ----------------------------
-- Table structure for sys_role_permission_relation
-- ----------------------------
DROP TABLE IF EXISTS `sys_role_permission_relation`;
CREATE TABLE `sys_role_permission_relation`  (
  `id` int(11) NOT NULL AUTO_INCREMENT COMMENT '主键id',
  `role_id` int(11) NULL DEFAULT NULL COMMENT '角色id',
  `permission_id` int(11) NULL DEFAULT NULL COMMENT '权限id',
  PRIMARY KEY (`id`) USING BTREE
) ENGINE = InnoDB AUTO_INCREMENT = 7 CHARACTER SET = utf8 COLLATE = utf8_general_ci COMMENT = '角色-权限关联关系表' ROW_FORMAT = Compact;

-- ----------------------------
-- Records of sys_role_permission_relation
-- ----------------------------
INSERT INTO `sys_role_permission_relation` VALUES (1, 1, 1);
INSERT INTO `sys_role_permission_relation` VALUES (2, 1, 2);
INSERT INTO `sys_role_permission_relation` VALUES (3, 1, 3);
INSERT INTO `sys_role_permission_relation` VALUES (4, 1, 4);
INSERT INTO `sys_role_permission_relation` VALUES (5, 2, 1);
INSERT INTO `sys_role_permission_relation` VALUES (6, 2, 2);

-- ----------------------------
-- Table structure for sys_user
-- ----------------------------
DROP TABLE IF EXISTS `sys_user`;
CREATE TABLE `sys_user`  (
  `id` int(11) NOT NULL AUTO_INCREMENT,
  `account` varchar(32) CHARACTER SET utf8 COLLATE utf8_general_ci NOT NULL COMMENT '账号',
  `user_name` varchar(32) CHARACTER SET utf8 COLLATE utf8_general_ci NOT NULL COMMENT '用户名',
  `password` varchar(64) CHARACTER SET utf8 COLLATE utf8_general_ci NULL DEFAULT NULL COMMENT '用户密码',
  `last_login_time` datetime NULL DEFAULT NULL COMMENT '上一次登录时间',
  `enabled` tinyint(1) NULL DEFAULT 1 COMMENT '账号是否可用。默认为1(可用)',
  `not_expired` tinyint(1) NULL DEFAULT 1 COMMENT '是否过期。默认为1(没有过期)',
  `account_not_locked` tinyint(1) NULL DEFAULT 1 COMMENT '账号是否锁定。默认为1(没有锁定)',
  `credentials_not_expired` tinyint(1) NULL DEFAULT 1 COMMENT '证书(密码)是否过期。默认为1(没有过期)',
  `create_time` datetime NULL DEFAULT NULL COMMENT '创建时间',
  `update_time` datetime NULL DEFAULT NULL COMMENT '修改时间',
  `create_user` int(11) NULL DEFAULT NULL COMMENT '创建人',
  `update_user` int(11) NULL DEFAULT NULL COMMENT '修改人',
  PRIMARY KEY (`id`) USING BTREE
) ENGINE = InnoDB AUTO_INCREMENT = 3 CHARACTER SET = utf8 COLLATE = utf8_general_ci COMMENT = '用户表' ROW_FORMAT = Compact;

-- ----------------------------
-- Records of sys_user
-- ----------------------------
INSERT INTO `sys_user` VALUES (1, 'admin', '李哈1', '$2a$10$/fs2JL/Dypng7pYZP8tZ6ufZZ9ZqtnhCSQAtCian2w5ND.kn/a4fK', '2022-03-30 16:10:17', 1, 1, 1, 1, '2019-08-29 06:29:24', '2022-03-30 16:10:17', 1, 1);
INSERT INTO `sys_user` VALUES (2, 'liha', '李哈2', '$2a$10$YSaBhUZyXotbndbhzVM/Y.kZlTeLKZDkBI/Afe5oLQ7jHXfjSml3m', '2022-03-30 11:06:00', 1, 1, 1, 1, '2019-08-29 06:29:24', '2022-03-30 11:06:00', 1, 2);

-- ----------------------------
-- Table structure for sys_user_role_relation
-- ----------------------------
DROP TABLE IF EXISTS `sys_user_role_relation`;
CREATE TABLE `sys_user_role_relation`  (
  `id` int(11) NOT NULL AUTO_INCREMENT COMMENT '主键id',
  `user_id` int(11) NULL DEFAULT NULL COMMENT '用户id',
  `role_id` int(11) NULL DEFAULT NULL COMMENT '角色id',
  PRIMARY KEY (`id`) USING BTREE
) ENGINE = InnoDB AUTO_INCREMENT = 3 CHARACTER SET = utf8 COLLATE = utf8_general_ci COMMENT = '用户角色关联关系表' ROW_FORMAT = Compact;

-- ----------------------------
-- Records of sys_user_role_relation
-- ----------------------------
INSERT INTO `sys_user_role_relation` VALUES (1, 1, 1);
INSERT INTO `sys_user_role_relation` VALUES (2, 2, 2);

SET FOREIGN_KEY_CHECKS = 1;
返回结果的枚举:
public enum ResultCode {
    /* 成功 */
    SUCCESS(200, "请求成功"),
    SUCCESS_login(200, "用户登录成功"),
    SUCCESS_logout(200, "用户退出成功"),

    /* 默认失败 */
    COMMON_FAIL(999, "失败"),

    /* 参数错误:1000~1999 */
    PARAM_NOT_VALID(1001, "参数无效"),
    PARAM_IS_BLANK(1002, "参数为空"),
    PARAM_TYPE_ERROR(1003, "参数类型错误"),
    PARAM_NOT_COMPLETE(1004, "参数缺失"),

    /* 用户错误 */
    USER_NOT_LOGIN(2001, "用户未登录"),
    USER_ACCOUNT_EXPIRED(2002, "账号已过期"),
    USER_CREDENTIALS_ERROR(2003, "密码错误"),
    USER_CREDENTIALS_EXPIRED(2004, "密码过期"),
    USER_ACCOUNT_DISABLE(2005, "账号不可用"),
    USER_ACCOUNT_LOCKED(2006, "账号被锁定"),
    USER_ACCOUNT_NOT_EXIST(2007, "账号不存在"),
    USER_ACCOUNT_ALREADY_EXIST(2008, "账号已存在"),
    USER_ACCOUNT_USE_BY_OTHERS(2009, "账号下线"),

    /* 业务错误 */
    NO_PERMISSION(3001, "当前账号没有此权限");
    private Integer code;
    private String message;

    ResultCode(Integer code, String message) {
        this.code = code;
        this.message = message;
    }

    public Integer getCode() {
        return code;
    }

    public void setCode(Integer code) {
        this.code = code;
    }

    public String getMessage() {
        return message;
    }

    public void setMessage(String message) {
        this.message = message;
    }

    /**
     * 根据code获取message
     *
     * @param code
     * @return
     */
    public static String getMessageByCode(Integer code) {
        for (ResultCode ele : values()) {
            if (ele.getCode().equals(code)) {
                return ele.getMessage();
            }
        }
        return null;
    }
}
返回结果的实体类如下:
@Data
public class JsonResult<T> implements Serializable {
    private Boolean success;
    private Integer errorCode;
    private String errorMsg;
    private T data;

    public JsonResult() {
    }

    // 成功或者失败都能走这个
    public JsonResult(boolean success) {
        this.success = success;
        this.errorMsg = success ? ResultCode.SUCCESS.getMessage() : ResultCode.COMMON_FAIL.getMessage();
        this.errorCode = success ? ResultCode.SUCCESS.getCode() : ResultCode.COMMON_FAIL.getCode();
    }

    // 成功或者失败都能走这个,并且可以传一个枚举来改变默认枚举的值
    public JsonResult(boolean success, ResultCode resultEnum) {
        this.success = success;
        // 传来的枚举为null就用默认的,不为null就用传来的枚举
        this.errorCode = success ? (resultEnum==null?ResultCode.SUCCESS.getCode():resultEnum.getCode()) : (resultEnum == null ? ResultCode.COMMON_FAIL.getCode() : resultEnum.getCode());
        this.errorMsg = success ? (resultEnum==null?ResultCode.SUCCESS.getMessage():resultEnum.getMessage()): (resultEnum == null ? ResultCode.COMMON_FAIL.getMessage() : resultEnum.getMessage());
    }

    // 成功或者失败都能用
    // 用户可以传一个任意对象过来,用默认的成功或者失败的枚举
    public JsonResult(boolean success, T data) {
        this.success = success;
        this.errorCode = success ? ResultCode.SUCCESS.getCode() : ResultCode.COMMON_FAIL.getCode();
        this.errorMsg = success ? ResultCode.SUCCESS.getMessage() : ResultCode.COMMON_FAIL.getMessage();
        this.data = data;
    }

    // 成功或者失败都能用
    // 用户可以传一个任意对象和自定义枚举过来
    public JsonResult(boolean success, ResultCode resultEnum, T data) {
        this.success = success;
        this.errorCode = success ? (resultEnum==null ? ResultCode.SUCCESS.getCode() : resultEnum.getCode()): (resultEnum == null ? ResultCode.COMMON_FAIL.getCode() : resultEnum.getCode());
        this.errorMsg = success ? (resultEnum==null ? ResultCode.SUCCESS.getMessage() : resultEnum.getMessage()) : (resultEnum == null ? ResultCode.COMMON_FAIL.getMessage() : resultEnum.getMessage());
        this.data = data;
    }
}
返回结果的包装类:
/**
 * @Author: liha
 * @Description:
 */
public class ResultTool {
    public static JsonResult success() {
        return new JsonResult(true);
    }

    public static JsonResult success(ResultCode resultEnum) {
        return new JsonResult(true,resultEnum);
    }

    public static <T> JsonResult<T> success(T data) {
        return new JsonResult(true, data);
    }

    public static <T> JsonResult<T> success(ResultCode resultEnum,T data){
        return new JsonResult<>(true,resultEnum,data);
    }

    public static JsonResult fail() {
        return new JsonResult(false);
    }

    public static JsonResult fail(ResultCode resultEnum) {
        return new JsonResult(false, resultEnum);
    }
}
JWT的工具类:
过期时间和秘钥大家可以自行设置/需要加密的字段也可以根据自己需要做处理
/**
 * @author liha
 * @since 2021/10/16
 */
public class JwtUtils {

    public static final long EXPIRE = 1000 * 60 * 60 * 24;//token过期时间   24小时
    public static final String APP_SECRET = "ukc8BDbRigUDaY6pZFfWus2jZWLPHO";//密钥


    public static String getJwtToken(String id, String account){

        String JwtToken = Jwts.builder()
                .setHeaderParam("typ", "JWT")
                .setHeaderParam("alg", "HS256")
                .setSubject("jacob-user")
                .setIssuedAt(new Date())
                .setExpiration(new Date(System.currentTimeMillis() + EXPIRE))
                .claim("id", id)
                .claim("account", account)
                .signWith(SignatureAlgorithm.HS256, APP_SECRET)
                .compact();

        return JwtToken;
    }

    /**
     * 根据token,判断token是否存在与有效
     * @param jwtToken
     * @return
     */
    public static boolean checkToken(String jwtToken) {
        if(StringUtils.isEmpty(jwtToken)) return false;
        try {
            Jwts.parser().setSigningKey(APP_SECRET).parseClaimsJws(jwtToken);
        } catch (Exception e) {
            e.printStackTrace();
            return false;
        }
        return true;
    }

    /**
     * 根据request判断token是否存在与有效(也就是把token取出来罢了)
     * @param request
     * @return
     */
    public static boolean checkToken(HttpServletRequest request) {
        try {
            String jwtToken = request.getHeader("UserToken");
            if(StringUtils.isEmpty(jwtToken)) return false;
            Jwts.parser().setSigningKey(APP_SECRET).parseClaimsJws(jwtToken);
        } catch (Exception e) {
            e.printStackTrace();
            return false;
        }
        return true;
    }

    /**
     * 根据token获取会员id
     * @param request
     * @return
     */
    public static String getMemberIdByJwtToken(HttpServletRequest request) {
        String jwtToken = request.getHeader("UserToken");
        if(StringUtils.isEmpty(jwtToken)) return "";
        try {
            // 这里解析可能会抛异常,所以try catch来捕捉
            Jws<Claims> claimsJws = Jwts.parser().setSigningKey(APP_SECRET).parseClaimsJws(jwtToken);
            Claims claims = claimsJws.getBody();
            return (String)claims.get("id");
        }catch (Exception e){
            e.printStackTrace();
            return "";
        }
    }


    /**
     * 根据token获取用户的account
     * @param request
     * @return
     */
    public static String getMemberAccountByJwtToken(HttpServletRequest request) {
        String jwtToken = request.getHeader("UserToken");
        if(StringUtils.isEmpty(jwtToken)) return "";
        try{
            Jws<Claims> claimsJws = Jwts.parser().setSigningKey(APP_SECRET).parseClaimsJws(jwtToken);
            Claims claims = claimsJws.getBody();
            return (String)claims.get("account");
        }catch (Exception e){
            e.printStackTrace();
            return "";
        }
    }
}
Spring Security层面:
首先,我们要明白,Spring security默认是帮你实现了一个登录页面的,我们要实现前后端分离肯定是要抛弃掉默认的登录页面,但是我们的登录判断还是交给Spring security来完成,所以需要实现UserDetailsService接口,这个接口来帮你完成登录的判断。并且我们知道用户的用户名和密码是要保存到DB中,所以这里需要注入Mapper的接口,来实现一个查询,并且把当前用户的权限和保存起来,其实这里也可以抽出一个User的实体类继承UserDetails接口,然后在下面的接口的loadUserByUsername实现方法中返回我们的User实体类。

@Service
public class SecurityUserServiceImpl implements SecurityUserService {

    @Autowired
    private SysUserMapper sysUserMapper;

    @Autowired
    private SysPermissionMapper sysPermissionMapper;

    /**
     * 根据用户名查找数据库,判断是否存在这个用户
     * */
    @Override
    public UserDetails loadUserByUsername(String username) throws UsernameNotFoundException {

        // 用户名必须是唯一的,不允许重复
        SysUser sysUser = sysUserMapper.selectOne(new QueryWrapper<SysUser>().eq("account",username));

        if(StringUtils.isEmpty(sysUser)){
            throw new UsernameNotFoundException("根据用户名找不到该用户的信息!");
        }

        List<SysPermission> sysPermissions = sysPermissionMapper.getUserRolesByUserId(sysUser.getId());
        List<GrantedAuthority> grantedAuthorities = new ArrayList<>();
        sysPermissions.stream().forEach(sysPermission -> {
            GrantedAuthority grantedAuthority = new SimpleGrantedAuthority(sysPermission.getPermissionCode());
            grantedAuthorities.add(grantedAuthority);
        });

        return new User(sysUser.getAccount(), sysUser.getPassword(), sysUser.getEnabled(), sysUser.getNotExpired(), sysUser.getCredentialsNotExpired(), sysUser.getAccountNotLocked(), grantedAuthorities);
    }
}
Mybatis语句如下:
<select id="getUserRolesByUserId" resultType="com.entontech.entiry.SysPermission">
    SELECT
        p.*
    FROM
        sys_user AS u
            LEFT JOIN sys_user_role_relation AS ur
                      ON u.id = ur.user_id
            LEFT JOIN sys_role AS r
                      ON r.id = ur.role_id
            LEFT JOIN sys_role_permission_relation AS rp
                      ON r.id = rp.role_id
            LEFT JOIN sys_permission AS p
                      ON p.id = rp.permission_id
    WHERE u.id = #{userId}
</select>
我们要明白,前后端分离的项目,只能返回Json数据给前段的拦截器来对JSON做处理,实现一些页面跳转的功能,而前后端不分离的项目可以实现内部的请求转发或者重定向之类的实现页面跳转,并且我们知道,对于一个系统来说有很多功能是需要登录了才能访问的,所以下面就是未登录的一个处理。
/**
 * @author liha
 * @version 1.0
 * @date 2022/3/28 15:31
 * @description 用户未登录
 */
@Component
public class CustomizeAuthenticationEntryPoint implements AuthenticationEntryPoint {

    // 返回的是Json数据
    @Override
    public void commence(HttpServletRequest httpServletRequest, HttpServletResponse httpServletResponse, AuthenticationException e) throws IOException, ServletException {
        JsonResult result = ResultTool.fail(ResultCode.USER_NOT_LOGIN);
        httpServletResponse.setContentType("text/json;charset=utf-8");
        httpServletResponse.getWriter().write(JSON.toJSONString(result));
    }
}
当用户登录以后,有一些接口是只能时管理员身份来访问的,有一些接口是对外开放的,所以前后端分离的项目中,对于一个权限的处理,也只能后端给前段返回JSON数据,前段拦截器来做出来,后端的权限控制如下:
/**
 * @author liha
 * @version 1.0
 * @date 2022/3/29 9:52
 * @description 没有权限
 */
@Component
public class CustomizeAccessDeniedHandler implements AccessDeniedHandler {
    @Override
    public void handle(HttpServletRequest httpServletRequest, HttpServletResponse httpServletResponse, AccessDeniedException e) throws IOException, ServletException {
        JsonResult noPermission = ResultTool.fail(ResultCode.NO_PERMISSION);
        //处理编码方式,防止中文乱码的情况
        httpServletResponse.setContentType("text/json;charset=utf-8");
        // 把Json数据放到HttpServletResponse中返回给前台
        httpServletResponse.getWriter().write(JSON.toJSONString(noPermission));
    }
}
对于用户登录时候,可能会出现成功或者失败2中情况,所以2中情况也是需要处理的。2中情况也是只能返回Json数据,前段拦截器做处理。
下面是失败的处理。
/**
 * @author liha
 * @version 1.0
 * @date 2022/3/28 15:37
 * @description 登录账户时失败的处理
 */
@Component
public class CustomizeAuthenticationFailureHandler implements AuthenticationFailureHandler {

    @Override
    public void onAuthenticationFailure(HttpServletRequest httpServletRequest, HttpServletResponse httpServletResponse, AuthenticationException e) throws IOException, ServletException {
        //返回json数据
        JsonResult result = null;
        if (e instanceof AccountExpiredException) {
            //账号过期
            result = ResultTool.fail(ResultCode.USER_ACCOUNT_EXPIRED);
        } else if (e instanceof BadCredentialsException) {
            //密码错误
            result = ResultTool.fail(ResultCode.USER_CREDENTIALS_ERROR);
        } else if (e instanceof CredentialsExpiredException) {
            //密码过期
            result = ResultTool.fail(ResultCode.USER_CREDENTIALS_EXPIRED);
        } else if (e instanceof DisabledException) {
            //账号不可用
            result = ResultTool.fail(ResultCode.USER_ACCOUNT_DISABLE);
        } else if (e instanceof LockedException) {
            //账号锁定
            result = ResultTool.fail(ResultCode.USER_ACCOUNT_LOCKED);
        } else if (e instanceof InternalAuthenticationServiceException) {
            //用户不存在
            result = ResultTool.fail(ResultCode.USER_ACCOUNT_NOT_EXIST);
        }else{
            //其他错误
            result = ResultTool.fail(ResultCode.COMMON_FAIL);
        }
        //处理编码方式,防止中文乱码的情况
        httpServletResponse.setContentType("text/json;charset=utf-8");
        // 把Json数据放入到HttpServletResponse中返回给前台
        httpServletResponse.getWriter().write(JSON.toJSONString(result));
    }
}
下面是成功的处理,而我们知道,整合JWT以后,登录成功后,肯定是需要根据某些字段生成Token给前段返回的,所以也就是这里来做处理,并且根据自己的业务可以在登录成功的处理中加上自己业务的逻辑。
/**
 * @author liha
 * @version 1.0
 * @date 2022/3/28 15:39
 * @description 登录成功
 */
@Component
public class CustomizeAuthenticationSuccessHandler implements AuthenticationSuccessHandler {
    @Autowired
    SysUserMapper mapper;

    @Override
    public void onAuthenticationSuccess(HttpServletRequest httpServletRequest, HttpServletResponse httpServletResponse, Authentication authentication) throws IOException, ServletException {
        //更新用户表上次登录时间、更新人、更新时间等字段
        User userDetails = (User) SecurityContextHolder.getContext().getAuthentication().getPrincipal();
        SysUser sysUser = mapper.selectOne(new QueryWrapper<SysUser>().eq("account",userDetails.getUsername()));
        sysUser.setLastLoginTime(new Date());
        sysUser.setUpdateTime(new Date());
        sysUser.setUpdateUser(sysUser.getId());
        mapper.update(sysUser,new QueryWrapper<SysUser>().eq("id",sysUser.getId()));

        // 根据用户的id和account生成token并返回
        String jwtToken = JwtUtils.getJwtToken(sysUser.getId().toString(), sysUser.getAccount());
        Map<String,String> results = new HashMap<>();
        results.put("token",jwtToken);

        //返回json数据
        JsonResult result = ResultTool.success(ResultCode.SUCCESS_login,results);
        //处理编码方式,防止中文乱码的情况
        httpServletResponse.setContentType("text/json;charset=utf-8");
        // 把Json数据放入HttpServletResponse中返回给前台
        httpServletResponse.getWriter().write(JSON.toJSONString(result));
    }
}
退出登录的处理,对于退出登录,也就是后端返回Json,前段删除Token。退出的大部分功能还是需要前段来处理。
/**
 * @author liha
 * @version 1.0
 * @date 2022/3/28 15:38
 * @description 退出登录
 */
@Component
public class CustomizeLogoutSuccessHandler implements LogoutSuccessHandler {
    @Override
    public void onLogoutSuccess(HttpServletRequest httpServletRequest, HttpServletResponse httpServletResponse, Authentication authentication) throws IOException, ServletException {
        JsonResult result = ResultTool.success(ResultCode.SUCCESS_logout);
        httpServletResponse.setContentType("text/json;charset=utf-8");
        httpServletResponse.getWriter().write(JSON.toJSONString(result));
    }
}我们把这么多功能的处理写完了,但是我们项目毕竟是基于JWT的前后端分离,所以我们需要自己实现一个Filter接口,来实现自定义的JWT过滤器功能,来实现对Token的处理。所以我们定义一个JWT过滤器类实现OncePerRequestFilter接口。
下面也就是对Token的一个判断,并且通过Token获取到用户的信息,然后再通过用户的信息获取到权限添加到SecurityContext。我的理解就是这样就可以实现只需要判断一次获取到一个令牌,然后把用户的信息做一个存储。
/**
 * @author liha
 * @version 1.0
 * @date 2022/3/30 10:28
 * @description 这个过滤器用来判断JWT是否有效
 */
@Component
public class JwtAuthenticationTokenFilter extends OncePerRequestFilter {
    /**
     * 直接将我们前面写好的service注入进来,通过service获取到当前用户的权限
     * */
    @Autowired
    private SecurityUserService userDetailsService;

    @Override
    protected void doFilterInternal(HttpServletRequest httpServletRequest, HttpServletResponse httpServletResponse, FilterChain filterChain) throws ServletException, IOException {
        // 获取当请求头中的token,其实这里多余,完全可以使用HttpServletRequest来获取
        String authToken = httpServletRequest.getHeader("UserToken");

        // 获取到当前用户的account
        String account = JwtUtils.getMemberAccountByJwtToken(httpServletRequest);

        System.out.println("自定义JWT过滤器获得用户名为"+account);

        // 当token中的username不为空时进行验证token是否是有效的token
        if (!account.equals("") && SecurityContextHolder.getContext().getAuthentication() == null) {
            // token中username不为空,并且Context中的认证为空,进行token验证

            // 获取到用户的信息,也就是获取到用户的权限
            UserDetails userDetails = this.userDetailsService.loadUserByUsername(account);

            if (JwtUtils.checkToken(authToken)) {   // 验证当前token是否有效

                UsernamePasswordAuthenticationToken authentication =
                        new UsernamePasswordAuthenticationToken(userDetails, null, userDetails.getAuthorities());

                authentication.setDetails(new WebAuthenticationDetailsSource().buildDetails(httpServletRequest));

                //将authentication放入SecurityContextHolder中
                SecurityContextHolder.getContext().setAuthentication(authentication);
            }
        }
        // 放行给下个过滤器
        filterChain.doFilter(httpServletRequest, httpServletResponse);
    }
}
此时,我们还需要根据不同的请求来做权限的判断,这里我们总不能把所有请求都写在配置文件中把,我们肯定是需要放在DB中,然后请求一过来获取到请求路径,然后根据请求路径查询数据库获取到具体的权限,然后根据权限再判断当前的角色是否有权利。
这里是获取到请求,然后查询数据库获取到权限。
/**
 * @author liha
 * @version 1.0
 * @date 2022/3/28 16:48
 * @description 根据请求,查询数据库,看看这个请求是那些角色能访问
 */
@Component
public class CustomizeFilterInvocationSecurityMetadataSource implements FilterInvocationSecurityMetadataSource {
    AntPathMatcher antPathMatcher = new AntPathMatcher();

    @Autowired
    SysPermissionMapper sysPermissionMapper;

    @Override
    public Collection<ConfigAttribute> getAttributes(Object o) throws IllegalArgumentException {
        // 获取请求地址
        String requestUrl = ((FilterInvocation) o).getRequestUrl();
        // 查询具体某个接口的权限
        List<SysPermission> permissionList =  sysPermissionMapper.selectListByPath(requestUrl);
        if(permissionList == null || permissionList.size() == 0){
            // 请求路径没有配置权限,表明该请求接口可以任意访问
            return null;
        }
        String[] attributes = new String[permissionList.size()];
        for(int i = 0;i<permissionList.size();i++){
            attributes[i] = permissionList.get(i).getPermissionCode();
        }
        return SecurityConfig.createList(attributes);
    }

    @Override
    public Collection<ConfigAttribute> getAllConfigAttributes() {
        return null;
    }

    @Override
    public boolean supports(Class<?> aClass) {
        return true;
    }
}
Mybatis语句如下:
<select id="selectListByPath" resultType="com.entontech.entiry.SysPermission">
    select p.*
    from sys_permission as p
    left join sys_request_path_permission_relation as srp
        on p.id = srp.permission_id
    left join sys_request_path as sr
        on srp.url_id = sr.id
    where sr.url = #{requestUrl}
</select>
上一步根据请求获取到当前请求的权限,所以我们还需要获取到之前UserDetailsService接口的实现方法loadUserByUsername存入的当前用户的权限做一个匹对。
/**
 * @author liha
 * @version 1.0
 * @date 2022/3/28 16:48
 * @description 匹对权限
 */
@Component
public class CustomizeAccessDecisionManager implements AccessDecisionManager {
    @Override
    public void decide(Authentication authentication, Object o, Collection<ConfigAttribute> collection) throws AccessDeniedException, InsufficientAuthenticationException {
        Iterator<ConfigAttribute> iterator = collection.iterator();
        while (iterator.hasNext()) {
            ConfigAttribute ca = iterator.next();
            // 当前请求需要的权限
            String needRole = ca.getAttribute();
            // 当前用户所具有的权限
            Collection<? extends GrantedAuthority> authorities = authentication.getAuthorities();
            for (GrantedAuthority authority : authorities) {
                if (authority.getAuthority().equals(needRole)) {
                    return;
                }
            }
        }
        throw new AccessDeniedException("权限不足!");
    }

    @Override
    public boolean supports(ConfigAttribute configAttribute) {
        return true;
    }

    @Override
    public boolean supports(Class<?> aClass) {
        return true;
    }
}
此时我们还需要一步,就是把前面2者的操作给串通起来,因为根据路径获取到权限,和登录时存的权限需要一个桥梁来判断。
**
 * @author liha
 * @version 1.0
 * @date 2022/3/28 16:47
 * @description  我的理解是这个过滤器能把前2步的操作给连接起来
 */
@Service
public class CustomizeAbstractSecurityInterceptor extends AbstractSecurityInterceptor implements Filter {

    @Autowired
    private FilterInvocationSecurityMetadataSource securityMetadataSource;

    @Autowired
    public void setMyAccessDecisionManager(CustomizeAccessDecisionManager accessDecisionManager) {
        super.setAccessDecisionManager(accessDecisionManager);
    }

    @Override
    public Class<?> getSecureObjectClass() {
        return FilterInvocation.class;
    }

    @Override
    public SecurityMetadataSource obtainSecurityMetadataSource() {
        return this.securityMetadataSource;
    }

    @Override
    public void doFilter(ServletRequest servletRequest, ServletResponse servletResponse, FilterChain filterChain) throws IOException, ServletException {
        FilterInvocation fi = new FilterInvocation(servletRequest, servletResponse, filterChain);
        invoke(fi);
    }

    public void invoke(FilterInvocation fi) throws IOException, ServletException {
        //fi里面有一个被拦截的url
        //里面调用MyInvocationSecurityMetadataSource的getAttributes(Object object)这个方法获取fi对应的所有权限
        //再调用MyAccessDecisionManager的decide方法来校验用户的权限是否足够
        InterceptorStatusToken token = super.beforeInvocation(fi);
        try {
            //执行下一个拦截器
            fi.getChain().doFilter(fi.getRequest(), fi.getResponse());
        } finally {
            super.afterInvocation(token, null);
        }
    }
}
小科普:
如果@Autowirte注解写在方法上,就会把当前方法的参数从IoC容器中获取到,并且执行当前方法。
我们最早是写的SpringSecurity的一些处理逻辑,后面是写的自定义的一些过滤逻辑。 此时我们还需要把这些处理逻辑和自定义的过滤逻辑通过配置的情况放入到SpringSecurity中。
可以清楚的看到,也就是把我们写的处理逻辑可以自定义过滤器给注入,然后配置。
可以说这个配置是一个整体的架子,把不同的内容给填充进来。
/**
 * @author com.liha
 * @version 1.0
 * @date 2022/3/25 10:27
 * @description  SpringSecurity的配置类
 */
@Configuration
@EnableWebSecurity
public class MyConfig extends WebSecurityConfigurerAdapter {

    @Autowired
    private SecurityUserService securityUserService;

    @Autowired
    private AuthenticationEntryPoint authenticationEntryPoint;

    @Autowired
    private AuthenticationFailureHandler authenticationFailureHandler;

    @Autowired
    private LogoutSuccessHandler logoutSuccessHandler;

    @Autowired
    private AuthenticationSuccessHandler authenticationSuccessHandler;

    @Autowired
    private SessionInformationExpiredStrategy sessionInformationExpiredStrategy;

    @Autowired
    private CustomizeAbstractSecurityInterceptor customizeAbstractSecurityInterceptor;

    @Autowired
    private CustomizeAccessDecisionManager customizeAccessDecisionManager;

    @Autowired
    private CustomizeFilterInvocationSecurityMetadataSource customizeFilterInvocationSecurityMetadataSource;

    @Autowired
    private CustomizeAccessDeniedHandler customizeAccessDeniedHandler;

    @Autowired
    private JwtAuthenticationTokenFilter jwtAuthenticationTokenFilter;

    /**
     * 对请求进行鉴权的配置
     *
     * @param http
     * @throws Exception
     */
    @Override
    protected void configure(HttpSecurity http) throws Exception {

        http.cors()
                .and().csrf().disable();

        http.authorizeRequests().
                withObjectPostProcessor(new ObjectPostProcessor<FilterSecurityInterceptor>() {
                    @Override
                    public <O extends FilterSecurityInterceptor> O postProcess(O o) {
                        o.setAccessDecisionManager(customizeAccessDecisionManager);//访问决策管理器
                        o.setSecurityMetadataSource(customizeFilterInvocationSecurityMetadataSource);//安全元数据源
                        return o;
                    }
                });

        http.authorizeRequests()
                .and()
                    .exceptionHandling()
                    .authenticationEntryPoint(authenticationEntryPoint)
                    .accessDeniedHandler(customizeAccessDeniedHandler)
                .and()
                    .formLogin()  // 登录
                    .permitAll()  //允许所有用户
                    .successHandler(authenticationSuccessHandler)  //登录成功处理逻辑
                    .failureHandler(authenticationFailureHandler)  //登录失败处理逻辑
                .and()
                    .logout()      // 退出
                    .permitAll()   //允许所有用户
                    .logoutSuccessHandler(logoutSuccessHandler)  //退出成功处理逻辑
                    .deleteCookies("JSESSIONID")   //登出之后删除cookie
                .and()
                    .sessionManagement()    //会话管理
                    .maximumSessions(1)     //同一账号同时登录最大用户数
                    .expiredSessionStrategy(sessionInformationExpiredStrategy);

        http.addFilterBefore(customizeAbstractSecurityInterceptor, FilterSecurityInterceptor.class);
        http.addFilterBefore(jwtAuthenticationTokenFilter, UsernamePasswordAuthenticationFilter.class);
        http.headers().cacheControl();
    }

    @Override
    protected void configure(AuthenticationManagerBuilder auth) throws Exception {
        auth.userDetailsService(securityUserService);
    }

    /**
     * 默认开启密码加密,前端传入的密码Security会在加密后和数据库中的密文进行比对,一致的话就登录成功
     * 所以必须提供一个加密对象,供security加密前端明文密码使用
     * @return
     */
    @Bean
    PasswordEncoder passwordEncoder() {
        return new BCryptPasswordEncoder();
    }
}
密码的处理,由于security是要加密的密码,以BCryptPasswordEncoder类型生成的密码,所以我们写一个测试类来生成我们的需要的密码。
这里有一点要注意,生成的密码放入数据库的时候,记得ctrl+A全选数据库字段,双击的话可能不等于全线(别问我怎么知道的,被这东西困扰几个小时)
跨域处理,也是一个标有@Configuration的配置类。
/**
 * @author liha
 * @version 1.0
 * @date 2022/3/29 11:18
 * @description
 */
@Configuration
public class CronConfig {

    private CorsConfiguration buildConfig() {
        CorsConfiguration corsConfiguration = new CorsConfiguration();
        //  你需要跨域的地址  注意这里的 127.0.0.1 != localhost
        // * 表示对所有的地址都可以访问
        corsConfiguration.addAllowedOrigin("*");  // 1
        //  跨域的请求头
        corsConfiguration.addAllowedHeader("*"); // 2
        //  跨域的请求方法
        corsConfiguration.addAllowedMethod("*"); // 3
        //加上了这一句,大致意思是可以携带 cookie
        //最终的结果是可以 在跨域请求的时候获取同一个 session
        corsConfiguration.setAllowCredentials(true);
        return corsConfiguration;
    }
    @Bean
    public CorsFilter corsFilter() {
        UrlBasedCorsConfigurationSource source = new UrlBasedCorsConfigurationSource();
        //配置 可以访问的地址
        source.registerCorsConfiguration("/**", buildConfig());
        return new CorsFilter(source);
    }
}
security大功告成,
接下来就是controller的接口。
    @GetMapping("/deleteUser")
    public JsonResult deleteUser(){
        return ResultTool.success();
    }

    @GetMapping("test")
    public JsonResult test(){
        Map<String,String> map = new HashMap<>();
        map.put("hell","wolrd");
        return ResultTool.success(map);
    }
接下来就是我们的测试阶段,测试的话直接使用ApiPost或者是PostMan来测试把。有前段的也可以用前段来测试。
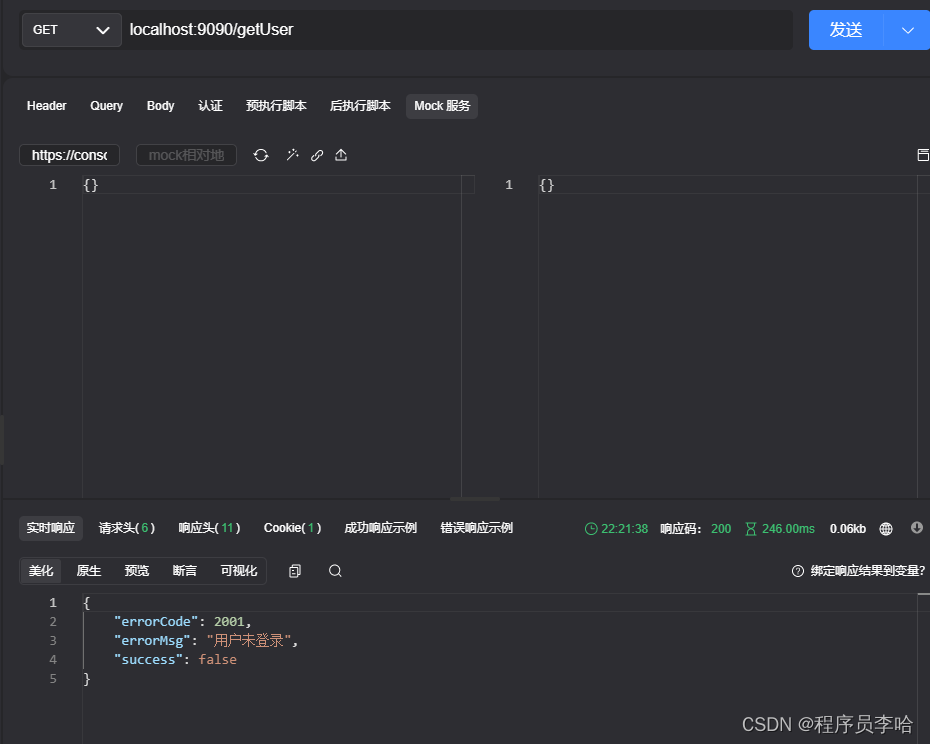
未登录时
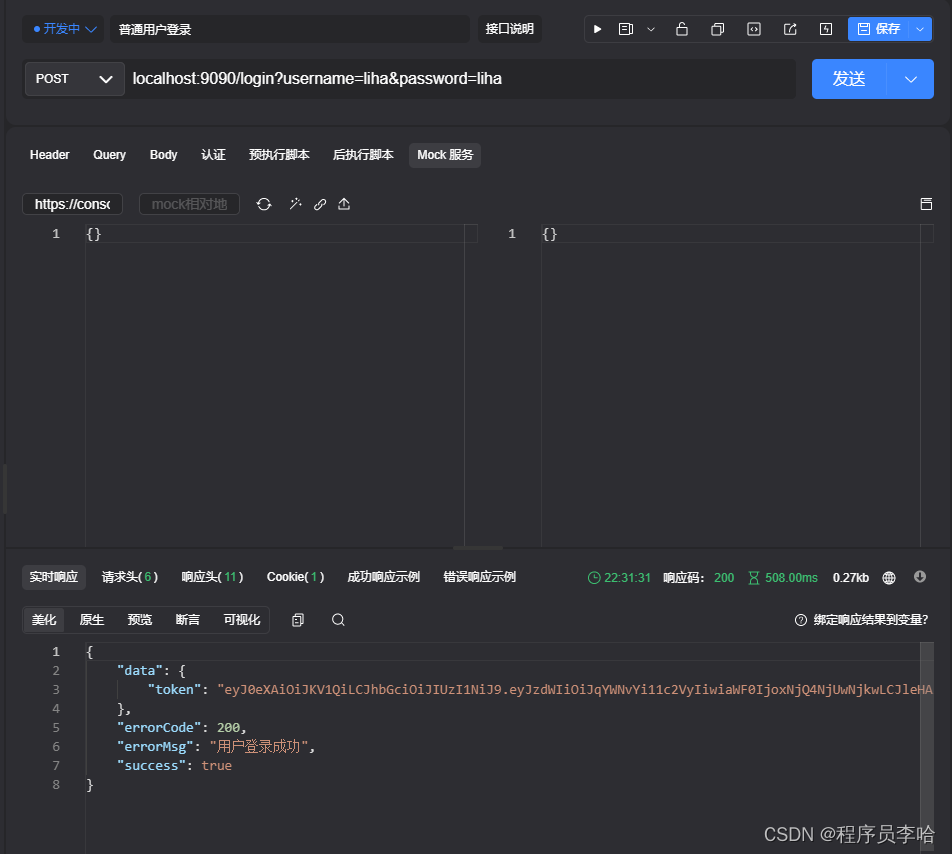
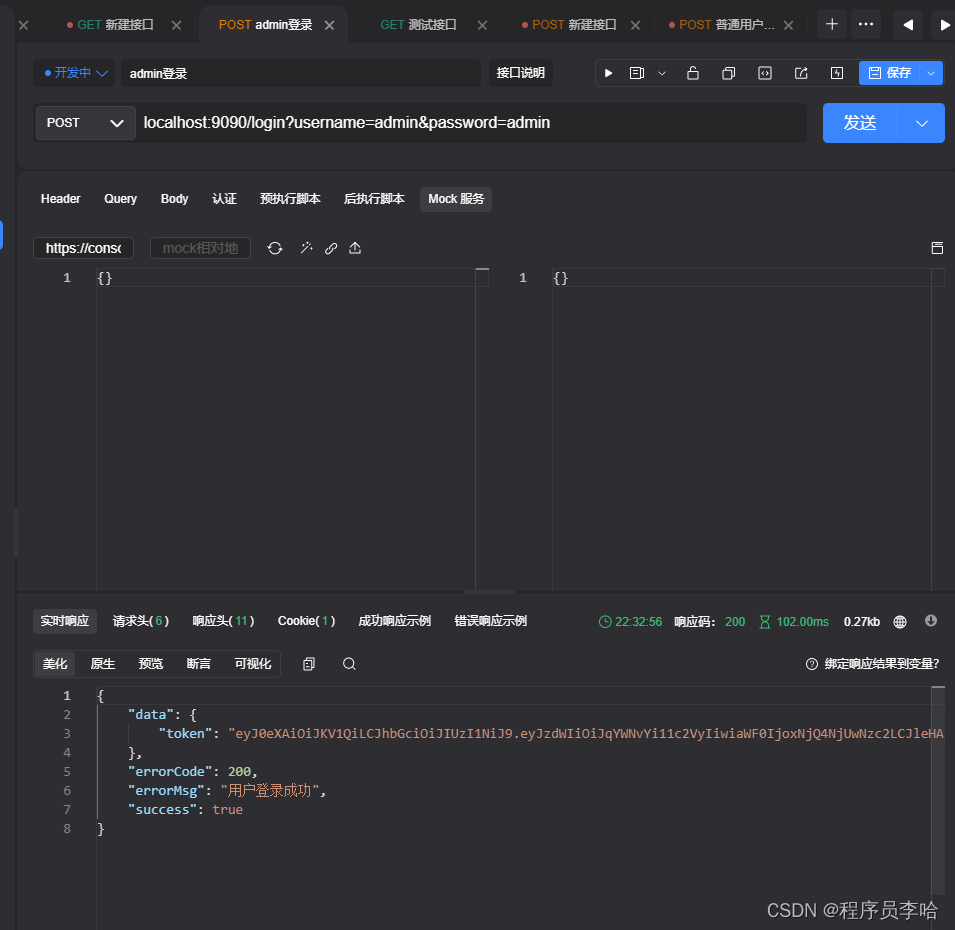
登录普通用户
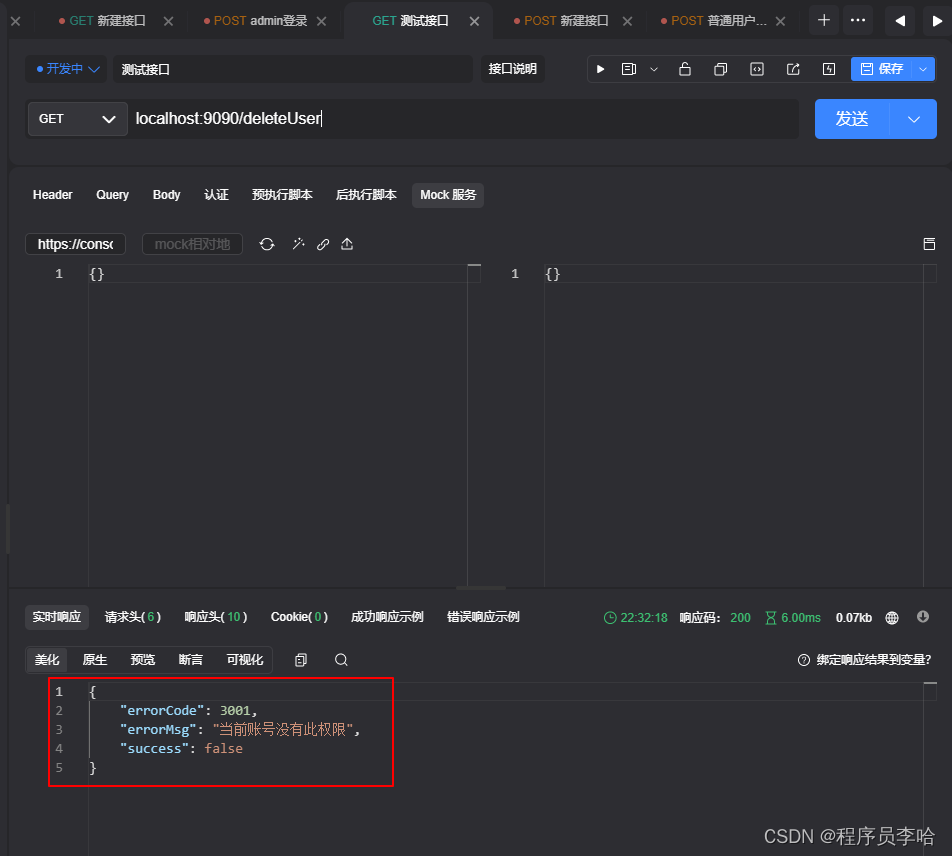
普通用户访问没有权限等接口时
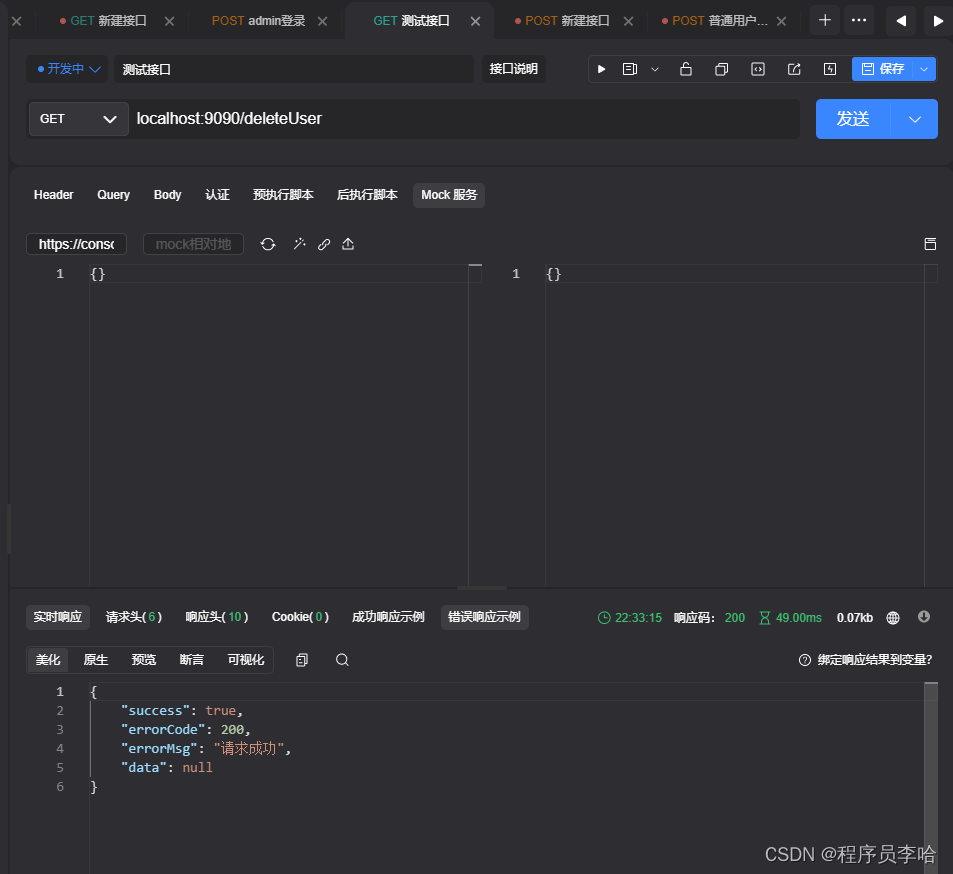
再登入管理员身份来测试deleteUser接口
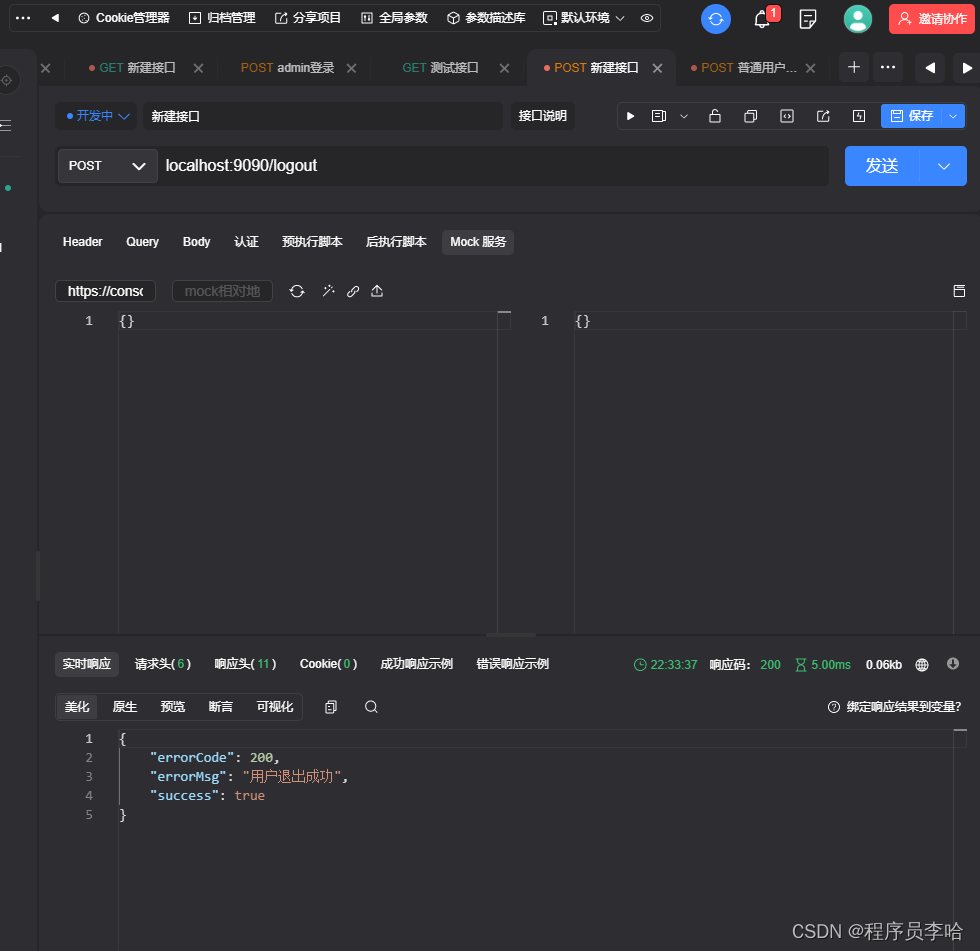
退出功能
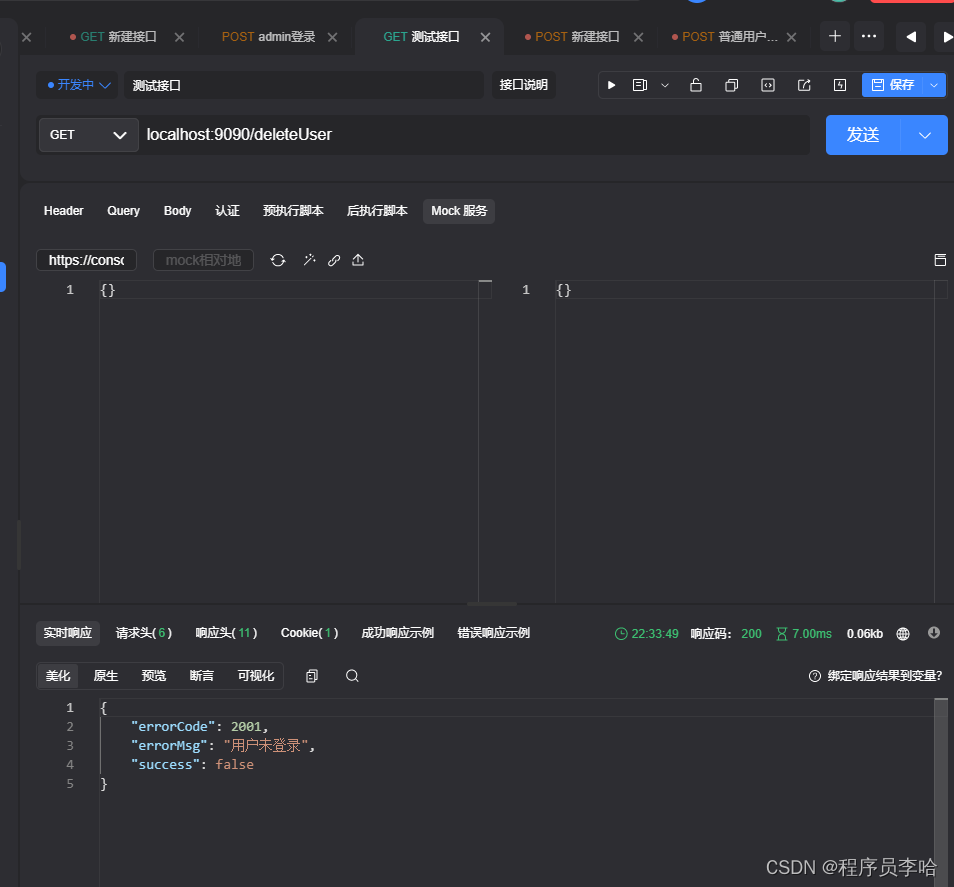
退出后再访问就是需要重新登录了
像个项目的Gitee地址如下:
整个项目Gitee地址 https://gitee.com/lihaJay/ssj
总结
基本上没讲什么底层实现,这篇是使用篇,后续会出Spring Security的底层源码讲解,并且如果本帖有问题的有疑问的读者可以在评论区留言,本人会积极处理。
最后,如果本帖对您有帮助,希望能点赞+关注+收藏。您的支持是我最大的动力,本人一直在努力的更新各种框架的使用和框架的源码解读~!

Authing 是一款以开发者为中心的全场景身份云产品,集成了所有主流身份认证协议,为企业和开发者提供完善安全的用户认证和访问管理服务
更多推荐


 40
40 0
0- 0


 已为社区贡献1条内容

所有评论(0)