
Nodejs 实现oauth2.0
最近需要实现REST API就涉及到授权认证的部分,最后选择对node-oauth2-server 进行封装实现。如果需要自己编写认证机制可参考:http://cnodejs.org/topic/516774906d38277306ff5647实现基础1 数据库mongodb2 node-oauth2-server (node 模块)node-oauth2-server模块源...
最近需要实现REST API就涉及到授权认证的部分,最后选择对node-oauth2-server 进行封装实现。
如果需要自己编写认证机制可参考:http://cnodejs.org/topic/516774906d38277306ff5647
实现基础
1 数据库mongodb
2 node-oauth2-server (node 模块)
node-oauth2-server模块源码地址:https://github.com/oauthjs/node-oauth2-server.git
官方文档:https://oauth2-server.readthedocs.io/en/latest/api/oauth2-server.html
参考文档:https://segmentfault.com/a/1190000010540911
第一部分 oauth2.0认证流程分析
1.1 oauth协议
OAuth 协议为用户资源的授权提供了一个安全的、开放而又简易的标准。
优点:OAuth的授权不会使第三方触及到用户的帐号信息(如用户名与密码),即第三方无需使用用户的用户名与密码就可以申请获得该用户资源的授权。
流程:用户登录了第三方的系统后,会先跳去服务方获取一次性用户授权凭据,再跳回来把它交给第三方。
第三方的服务器会把授权凭据以及服务方给它的的身份凭据一起交给服务方,这样,服务方一可以确定第三方得到了用户对此次服务的授权(根据用户授权凭据)二可以确定第三方的身份是可以信任的(根据身份凭据)。所以,最终的结果就是,第三方顺利地从服务方获取到了此次所请求的服务。
第三方客户端的授权模式:
客户端必须得到用户的授权(authorization grant),才能获得令牌(access token)。OAuth 2.0定义了四种授权方式。
授权码模式(authorization code)
简化模式(implicit)
密码模式(resource owner password credentials)
客户端模式(client credentials)
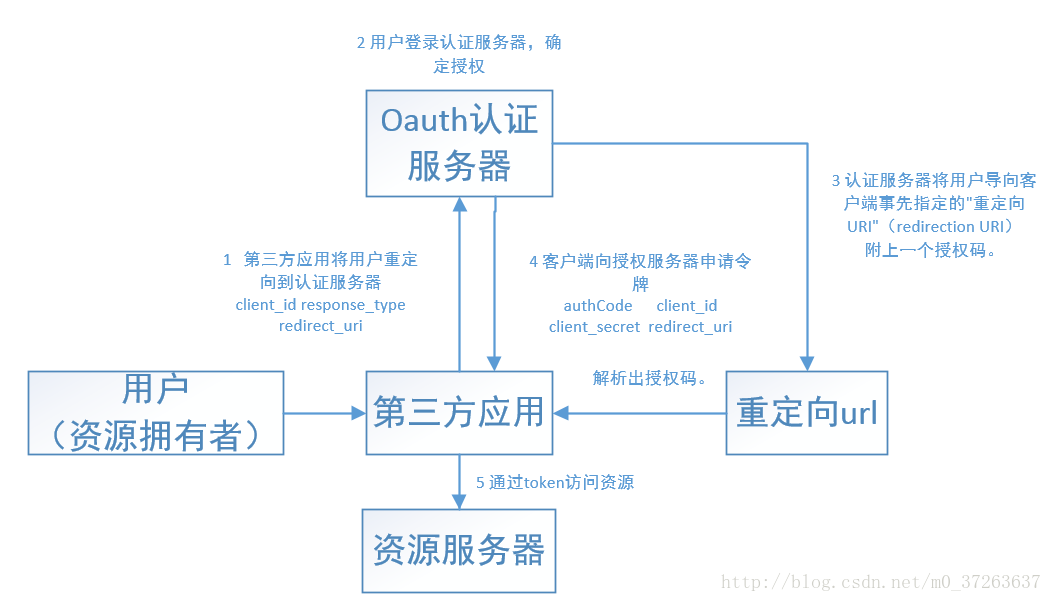
1.2 oauth2.0 授权码模式:
1 用户访问客户端,后者将前者导向认证服务器。
2 用户选择是否给予客户端授权。
3 假设用户给予授权,认证服务器 将 用户 导向客户端事先指定的”重定向URI”(redirection URI),同时附上一个授权码。
4 客户端收到授权码,附上早先的”重定向URI”,向认证服务器申请令牌。这一步是在客户端的后台的服务器上完成的,对用户不可见。
5 认证服务器核对了授权码和重定向URI,确认无误后,向客户端发送访问令牌(access token)和更新令牌(refresh token)。
1.3 oauth 客户端视角流程分析
1.3.1 用户访问客户端,后者将前者导向认证服务器。
发送post请求
用户访问第三方客户端(重定向),后者将前者导向认证服务器( /v1/oauth2/authorise )
 mocha testcode:
 request(app)
      .post('/v1/oauth2/authorise')
      .type('form')
      .set('Cookie', cookies)
      .send({
        allow: 'yes',
              client_id: myClient.id,
              response_type: 'code',
              redirect_uri: '/oauth2/redirect'
      })
1.3.2 用户选择是否给予客户端授权。
/v1/oauth2/authorise 这个接口,这里面有一个用户登录判断操作,登陆后即确定授权。
1.3.3 假设用户给予授权,认证服务器将用户导向客户端事先指定的”重定向URI”(redirection URI)
同时附上一个授权码。
redirect_uri这个重定向地址是让第三方接收authorization code(授权码) 来换access token的。
用户被重定向到了 ‘/oauth2/redirect’
同时返回一个授权码
这个code码是和appkey(appid)成对应的
客户端处理认证服务器的返回得到授权码
          res.header['location'].should.containEql('code')
          authCode = url.substr(url.indexOf('code=') + 5);
          console.info('Grant authCode:' + authCode);
1.3.4 客户端收到授权码加上client_id和client_secret,附上早先的”重定向URI”,向认证服务器申请令牌。
这一步是在客户端的后台的服务器上完成的,对用户不可见。
request(app)
      .post('/v1/oauth2/token')
      .type('form')
      .auth(clientCredentials, '')
      .send({
        grant_type: 'authorization_code',
        code: authCode,
        client_id: myClient.id,
        client_secret: myClient.secret,
        redirect_uri: '/oauth2/redirect'
      })

    assert(res.body.access_token, 'Ensure the access_token was set');
    assert(res.body.refresh_token, 'Ensure the refresh_token was set');
    accessToken = res.body.access_token;
    refreshToken = res.body.refresh_token;
1.3.5 最后 token认证
    request(app)
      .get('/v1/oauth2/secret')
      .set('Authorization', 'Bearer ' + accessToken)
      .expect(200, done);
Bearer 为令牌类型
在下次第三方应用发token换取授权api的时候,主站可以解开这个token,核对时间戳【看token的有效期是否合法】看id是否存在,检查一些其他隐藏属性是否被修改等,来进行再次身份确认。
1.4 一个流程猜测
直接这样描述流程比较抽象,可能大家都玩过王者荣耀,
我感觉它的机制应该就是oauth2.0授权机制,我不确定是不是,如果有大佬知道具体实现,请指教。
下面是我的猜测流程,具体分析下oauth2.0应用过程:
1 界面有一个qq或者微信登录,我们点击使用微信登录就相当于1步:
用户访问第三方客户端(重定向),后者将前者导向认证服务。
2 该界面登录微信(如果手机内有微信活动状态则会自动登录),用户确认是否授权,就相当于第2步:
用户选择是否给予客户端授权。(这里登录界面判断是哪个应用登录应该用的就是appID)
3 返回到了王者荣耀首页 这就相当于第3步:
用户给予授权,认证服务器将用户导向客户端事先指定的”重定向URI”(redirection URI)(王者荣耀首页),同时附上一个授权码。
然后首页开始缓冲(转圈) 这就相当于第4,5步(这一步已经对用户不可见了):
4步:客户端收到授权码,附上早先的”重定向URI”,及appkey和secret之后 向认证服务器申请令牌。
5步:得到token后,向微信资源服务器请求账号资源。
切换到用户界面(有账户信息)
第二部分 nodejs 实现oauth2.0
网友已实现的开源sample:
https://github.com/mekentosj/oauth2-example
node-oauth2-server 文档地址:
https://www.npmjs.com/package/node-oauth2-server
个人写的可能不够详细 ,强烈建议参考开源sample
2.1 在路由中引入node-oauth2-server模块
var oauthserver = require(‘node-oauth2-server’);
2.2 在model中实现Node-oauth2-server所需的数据库方法
oauthserver 模块需要注册自己实现的数据库操作(根据文档得到)。
oauth_authcode.js
oauth_accesstoken.js
oauth_client.js
oauth_refreshtoken.js
oauth.js
2.2.1 在oauth.js文件中需要按照规定格式提供oauthserver 需要数据库方法。
而这些方法具体实现则在上面4个文件中。我用到下面方法,可参考:
var AuthCode = require('./oauth_authcode');
var AccessToken = require('./oauth_accesstoken');
var RefreshToken = require('./oauth_refreshtoken');
var Client = require('./oauth_client');

module.exports.getAuthCode = AuthCode.getAuthCode;
module.exports.saveAuthCode = AuthCode.saveAuthCode;
module.exports.getAccessToken = AccessToken.getAccessToken;
module.exports.saveAccessToken = AccessToken.saveAccessToken;
module.exports.saveRefreshToken = RefreshToken.saveRefreshToken;
module.exports.getRefreshToken = RefreshToken.getRefreshToken;
module.exports.getClient = Client.getClient;
module.exports.grantTypeAllowed = Client.grantTypeAllowed;
2.2.2实现四个oauth2 所需的数据库及相应方法
官方文档:https://oauth2-server.readthedocs.io/en/latest/model/overview.html (需要实现的API形式)
2.2.2.1 oauth_authcode.js
需要实现下面两个方法:
getAuthorizationCode(authorizationCode, [callback])
saveAuthorizationCode(code, client, user, [callback])
2.2.2.2根据要实现的方法 可以列出相应的数据库Schema
var OAuthAuthCodeSchema = new Schema({
  authCode: { type: String, required: true, unique: true },
  clientId: String,
  userId: { type: String, required: true },
  expires: Date
});
2.2.2.3 第一个是get操作,可以用findOne 操作
module.exports.getAuthCode = function(authCode, callback) {
  OAuthAuthCodeModel.findOne({ authCode: authCode }, callback);
};
2.2.2.4 第二个是save操作,可以用updata操作实现
module.exports.saveAuthCode = function(code, clientId, userId, callback) {
  OAuthAuthCodeModel.update({ authCode: code }, {clientId:clientId}, { upsert: true }, function(err) {
    if (err) {
      console.error(err);
    }
    callback(err);
  });
};
2.2.3实现另外3个文件中的方法(接口参考官方文档及sample)
oauth_accesstoken.js
oauth_client.js
oauth_refreshtoken.js
都可以在官方文档找到需要实现的方法api形式。
2.3 使用
var oauthserver = require(‘node-oauth2-server’);
在待处理路由中通过models.oauth引入我们编写oauth.js模块。
2.3.1 得到authCode
router.post('/authorise', function(req, res, next) {
    验证用户身份
}, oauthserver({model: models.oauth,grants: ['password', 'authorization_code', 'refresh_token'],debug: tru}).authCodeGrant(function(req, next) {
    next(null, req.body.allow === 'yes', req.cookies['id'], null);
}));
按照1.3.1 mocha测试代码的形式post 解析重定向界面即可得到authcode。
2.3.2 得到token
router.all('/token', oauthserver({model: models.oauth,grants: ['password', 'authorization_code', 'refresh_token'],debug: tru}).grant());按照1.3.4中的mocha 代码即可得到token。

Authing 是一款以开发者为中心的全场景身份云产品,集成了所有主流身份认证协议,为企业和开发者提供完善安全的用户认证和访问管理服务
更多推荐


 1
1 0
0- 0


 已为社区贡献1条内容

所有评论(0)