
Spring Security用户认证和权限控制(自定义实现)
Spring Security用户认证和权限控制(自定义实现)1 说明2 用户认证相关的自定义实现2.1 自定义用户认证页面2.2 自定义退出功能2.3 自定义用户认证拦截器2.4 自定义用户认证处理器2.5 自定义用户认证对象2.6 自定义用户认证成功处理器2.7 自定义用户认证失败处理器2.8 自定义用户认证处理逻辑的应用3 权限控制相关的自定义实现3.1 自定义权限数据获取类3.2 自定义权
Spring Security用户认证和权限控制(自定义实现)
1 说明
Spring Security用户认证和权限控制(默认实现)这篇文章介绍了Spring Security默认实现的用户认证和权限控制这两大功能的使用方法和原理分析,但是,Spring Security框架也能够支持自定义的用户认证和权限控制的实现逻辑。
本文主要是在Spring Security用户认证和权限控制(默认实现)这篇文章的基础上介绍自定义的用户认证和权限控制的实现方法,以帮助读者实现满足个性化需求的用户认证和权限控制的功能。
2 用户认证相关的自定义实现
2.1 自定义用户认证页面
Spring Security默认的用户认证页面不太美观,也只能且必须输入用户名和密码,因此,一般都会选择自定义用户认证页面。自定义用户认证页面只需要以下几步:
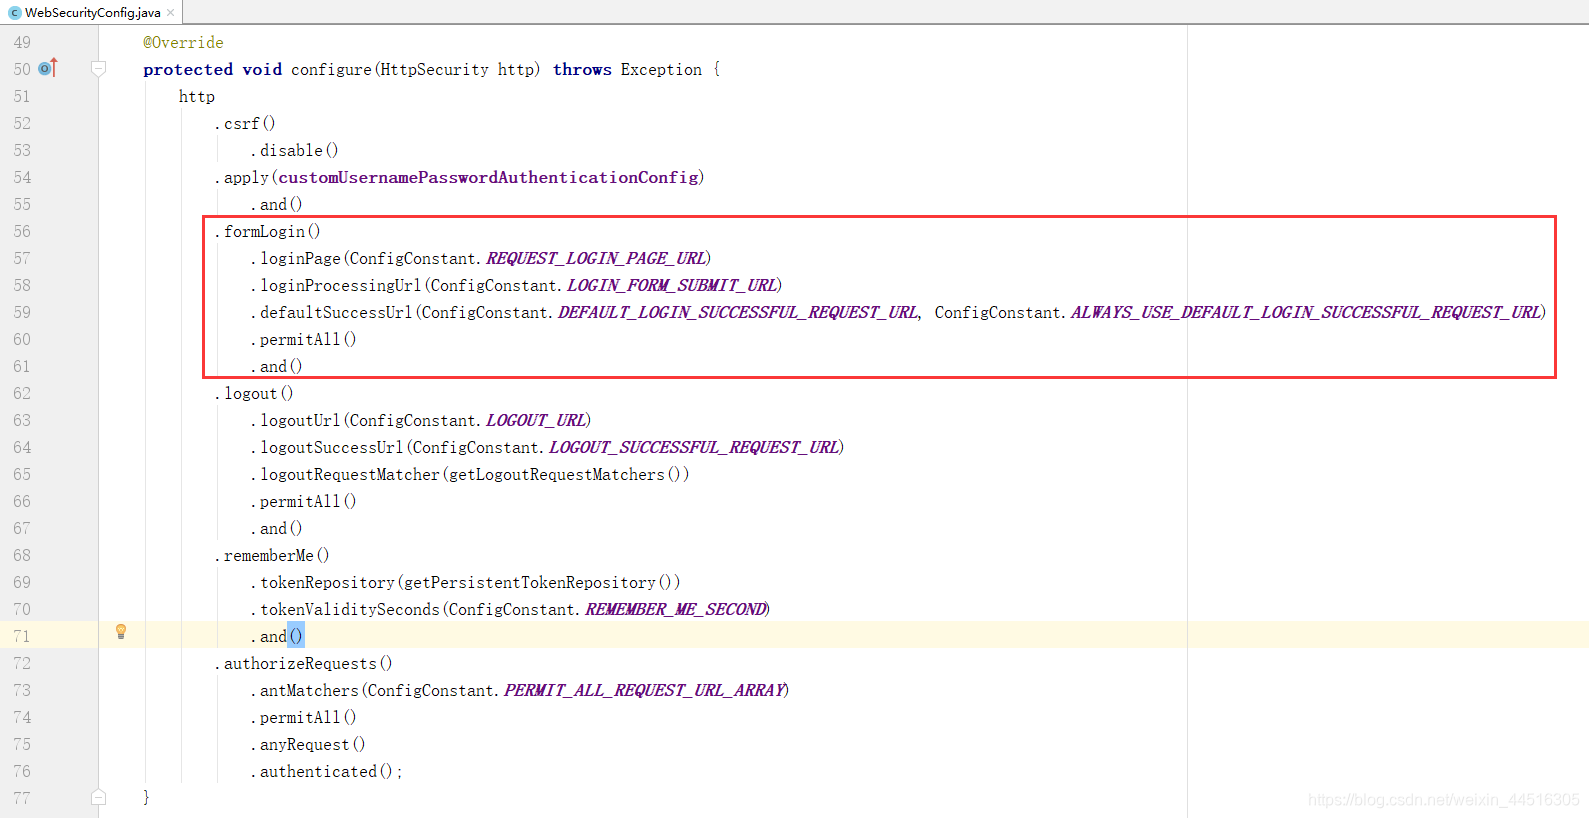
- 在Spring Security配置类中通过http.formlogin()设置表单登录时,通过loginPage(" URL")来指定请求认证页面的URL,以及通过loginProcessingUrl(" URL")来指定自定义的用户认证页面提交认证表单后发送请求的URL。当然,还可以通过defaultSuccessUrl(" URL")来指定默认认证成功后请求的URL。如下图所示:
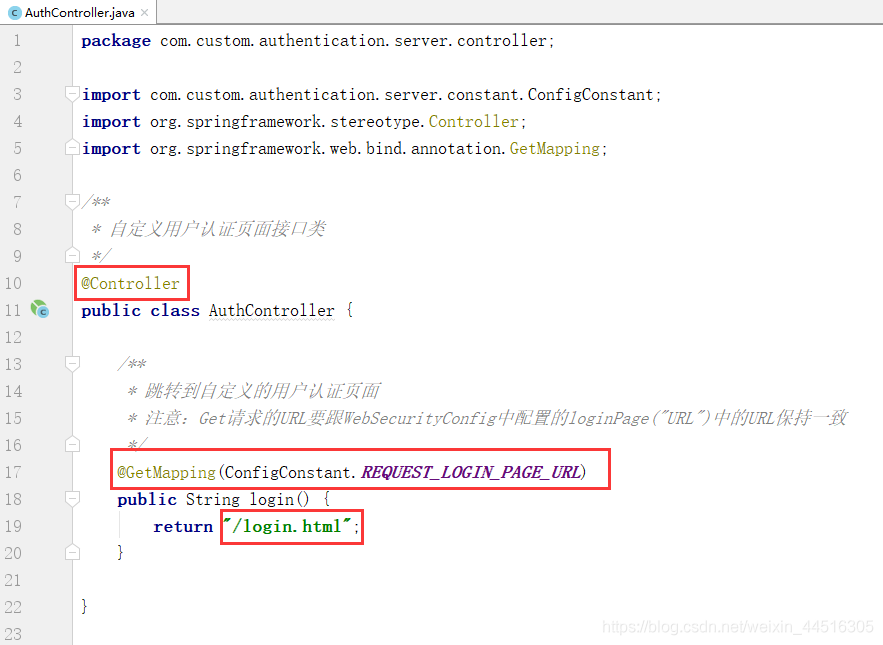
- 在Controller中写一个Get类型的方法,该方法的请求URL要与第1步中loginPage(" URL")配置的URL保持一致(本文中都为/login),且请求该方法后跳转到自定义的用户认证页面,如下图所示:
- 创建一个自定义的用户认证页面,页面的文件名称要与第2步中定义的方法的返回值保持一致(本文中都为login.html),且页面中表单提交的URL要与第1步中loginProcessingUrl(" URL")配置的URL保持一致(本文中都为/login),表单中可以根据个性化需求设定用户认证所需要的认证信息,如下图所示:

注意:如果想要在自定义的用户认证页面中使用"记住我"功能,则需要在自定义的用户认证页面中设置一个参数名为remember-me的选择框,并设置值为true,如上图中所示。
2.2 自定义退出功能
Spring Security提供了默认的用户认证和退出功能,但是当使用了自定义的用户认证页面之后,默认的退出功能就会无法使用。这是因为使用了自定义的用户认证页面后,Spring Security框架就不会创建DefaultLogoutPageGeneratingFilter对象(该对象主要是拦截GET类型的/logout请求并跳转到退出确认页面,用户在退出确认页面点击了确认按钮后才发送POST类型的/logout请求),通过在浏览器地址栏中请求/logout是GET类型的请求,因此,请求无法被处理,从而报错。而真正的退出需要POST类型的/logout请求。关于自定义用户认证页面导致退出功能异常的原因与解决方案具体请见Spring Security使用自定义的用户登录页面导致退出功能异常的原因分析与解决方案这篇文章。
我们可以在Spring Security配置类中通过http.logout()设置退出功能,并通过logoutRequestMatcher(RequestMatcher)来指定对GET类型和POST类型的/logout请求都执行退出操作,如下图所示:
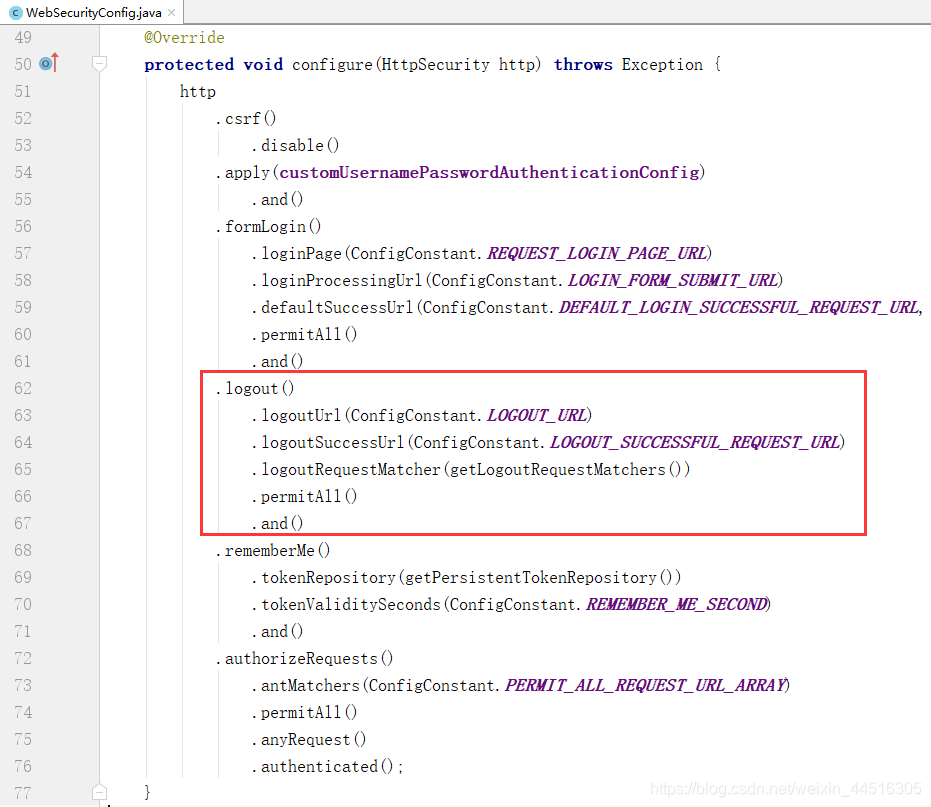
同时,也可以通过logoutUrl(" URL")来指定执行退出操作的URL(本文中都为/logout),以及通过logoutSuccessUrl(" URL")指定退出成功后自动请求的URL。
2.3 自定义记住我功能
Spring Security默认实现了"记住我"功能,具体而言是:用户认证时如果选择了"记住我"功能,则认证成功之后,Spring Security框架会通过UUID随机生成一个能够代表该用户已认证的Token,然后把该Token保存到内存中,同时保存到用户浏览器的Cookie中;当用户在Token的有效期内,关闭了浏览器之后再次发送访问请求时,就会通过Cookie中的Token自动通过认证,即不需要用户再输入账号和密码进行认证。
Spring Security默认是将代表用户已经认证的Token保存在内存中,但是也能够支持把Token保存到数据库中,我们可以在Spring Security配置类中通过http.rememberMe()设置记住我功能,并通过tokenRepository(PersistentTokenRepository)来指定保存Token的位置,如下图所示:

因此,需要我们自己创建一个PersistentTokenRepository对象,并指定数据源,如下图所示:

2.4 自定义用户认证拦截器
用户认证拦截器主要是拦截用户发送的认证请求,然后从请求中获取用户账号和密码等认证信息并封装成一个未认证的AthenticationToken对象,然后调用AuthenticationManager对AthenticationToken进行认证。
自定义的用户认证拦截器,需要继承AbstractAuthenticationProcessingFilter,并重写public Authentication attemptAuthentication(HttpServletRequest request, HttpServletResponse response)方法,本文自定义的用户认证拦截器的完整代码如下所示:
package com.custom.authentication.server.authentication;

import com.custom.authentication.server.constant.ConfigConstant;
import org.springframework.security.authentication.AuthenticationServiceException;
import org.springframework.security.authentication.InternalAuthenticationServiceException;
import org.springframework.security.core.Authentication;
import org.springframework.security.core.AuthenticationException;
import org.springframework.security.web.authentication.AbstractAuthenticationProcessingFilter;
import org.springframework.security.web.util.matcher.AntPathRequestMatcher;
import org.springframework.util.Assert;
import org.springframework.util.StringUtils;
import javax.servlet.http.HttpServletRequest;
import javax.servlet.http.HttpServletResponse;

/**
 * 自定义的用户名密码认证过滤器
 */
public class CustomUsernamePasswordAuthenticationFilter extends AbstractAuthenticationProcessingFilter {

    private String usernameParameter = "username";
    private String passwordParameter = "password";
    private boolean postOnly = true;

    public CustomUsernamePasswordAuthenticationFilter() {
        /**
         * 设置该过滤器对POST请求/login进行拦截
         */
        super(new AntPathRequestMatcher(ConfigConstant.LOGIN_FORM_SUBMIT_URL, "POST"));
    }

    @Override
    public Authentication attemptAuthentication(HttpServletRequest request, HttpServletResponse response) throws AuthenticationException {
        if (this.postOnly && !request.getMethod().equals("POST")) {
            throw new AuthenticationServiceException("Authentication method not supported: " + request.getMethod());
        } else {
            /**
             * 从http请求中获取用户输入的用户名和密码信息
             * 这里接收的是form形式的参数,如果要接收json形式的参数,修改这里即可
             */
            String username = this.obtainUsername(request);
            String password = this.obtainPassword(request);
            if(StringUtils.isEmpty(username) && StringUtils.isEmpty(password)) {
                throw new UsernameNotFoundException("CustomUsernamePasswordAuthenticationFilter获取用户认证信息失败");
            }
            /**
             * 使用用户输入的用户名和密码信息创建一个未认证的用户认证Token
             */
            CustomUsernamePasswordAuthenticationToken authRequest = new CustomUsernamePasswordAuthenticationToken(username, password);
            /**
             * 设置一些详情信息
             */
            this.setDetails(request, authRequest);
            /**
             * 通过AuthenticationManager调用相应的AuthenticationProvider进行用户认证
             */
            return this.getAuthenticationManager().authenticate(authRequest);
        }
    }

    protected String obtainUsername(HttpServletRequest request) {
        return request.getParameter(this.usernameParameter);
    }

    protected String obtainPassword(HttpServletRequest request) {
        return request.getParameter(this.passwordParameter);
    }

    protected void setDetails(HttpServletRequest request, CustomUsernamePasswordAuthenticationToken authRequest) {
        authRequest.setDetails(this.authenticationDetailsSource.buildDetails(request));
    }

    public void setUsernameParameter(String usernameParameter) {
        Assert.hasText(usernameParameter, "Username parameter must not be empty or null");
        this.usernameParameter = usernameParameter;
    }

    public void setPasswordParameter(String passwordParameter) {
        Assert.hasText(passwordParameter, "Password parameter must not be empty or null");
        this.passwordParameter = passwordParameter;
    }

    public void setPostOnly(boolean postOnly) {
        this.postOnly = postOnly;
    }

    public final String getUsernameParameter() {
        return this.usernameParameter;
    }

    public final String getPasswordParameter() {
        return this.passwordParameter;
    }
}
自定义的用户认证拦截器要在构造方法中指定拦截的认证请求(本文中是POST类型的/login请求,可根据需求设置),并在attemptAuthentication()方法中实现获取用户认证信息、封装AuthenticationToken对象、调用AuthenticationManager对AuthenticationToken进行认证等逻辑。
注意:自定义的用户认证拦截器的使用请见2.9小节。
2.5 自定义用户认证处理器
用户认证处理器主要是对用户提交的认证信息进行认证,Spring Security默认实现的认证处理器的认证处理逻辑并不一定符合所有的业务需求(例如,默认的认证处理无法处理验证码),因此,可以自定义用户认证处理器。
自定义的用户认证处理器,需要实现AuthenticationProvider接口,主要是实现public Authentication authenticate(Authentication authentication)方法和public boolean supports(Class<?> authentication)方法,前者主要是实现具体的认证逻辑,后者主要是指定认证处理器能对哪种AuthenticationToken对象进行认证。本文自定义的用户认证处理器的完整代码如下所示:
package com.custom.authentication.server.authentication;

import org.springframework.beans.factory.annotation.Autowired;
import org.springframework.security.authentication.AuthenticationProvider;
import org.springframework.security.authentication.InternalAuthenticationServiceException;
import org.springframework.security.core.Authentication;
import org.springframework.security.core.AuthenticationException;
import org.springframework.security.core.userdetails.UserDetails;
import org.springframework.security.core.userdetails.UserDetailsService;
import org.springframework.security.crypto.password.PasswordEncoder;
import org.springframework.stereotype.Component;

/**
 * 自定义的用户名密码认证实现类
 */
@Component("customUsernamePasswordAuthenticationProvider")
public class CustomUsernamePasswordAuthenticationProvider implements AuthenticationProvider {

    @Autowired
    private PasswordEncoder passwordEncoder;

    @Autowired
    private UserDetailsService userDetailsServiceImpl;

    @Override
    public Authentication authenticate(Authentication authentication) throws AuthenticationException {
        /**
         * 将未认证的Authentication转换成自定义的用户认证Token
         */
        CustomUsernamePasswordAuthenticationToken authenticationToken = (CustomUsernamePasswordAuthenticationToken) authentication;

        /**
         * 根据用户Token中的用户名查找用户信息,如果有该用户信息,则验证用户密码是否正确
         */
        UserDetails user = userDetailsServiceImpl.loadUserByUsername((String)(authenticationToken.getPrincipal()));
        if(user == null) {
            throw new InternalAuthenticationServiceException("CustomUsernamePasswordAuthenticationProvider获取认证用户信息失败");
        } else if(!this.passwordEncoder.matches((CharSequence) authenticationToken.getCredentials(), user.getPassword())) {
            throw new BadCredentialsException("用户名或密码不正确");
        }
        /**
         * 认证成功则创建一个已认证的用户认证Token
         */
        CustomUsernamePasswordAuthenticationToken authenticationResult = new CustomUsernamePasswordAuthenticationToken(user, user.getPassword(), user.getAuthorities());
        /**
         * 设置一些详情信息
         */
        authenticationResult.setDetails(authenticationToken.getDetails());
        return authenticationResult;
    }

    @Override
    public boolean supports(Class<?> authentication) {
        /**
         * 指定该认证处理器能对CustomUsernamePasswordAuthenticationToken对象进行认证
         */
        return CustomUsernamePasswordAuthenticationToken.class.isAssignableFrom(authentication);
    }

}
注意:自定义的用户认证处理器的使用请见2.9小节。
2.6 自定义用户认证对象
用户认证对象是在用户认证拦截器中创建的,在用户认证处理器中使用的,具体可见2.4节和2.5节中。
用户认证对象(AuthenticationToken)中封装的是用户认证信息,例如,UsernamePasswordAuthenticationToken中封装的是用户名和密码。实际业务中,可能需要根据不同的用户信息进行认证(例如,手机号和验证码),此时就需要自定义用户认证对象。
自定义的用户认证对象,需要继承AbstractAuthenticationToken类,并设定根据认证时使用的是哪些信息。本文自定义的用户认证对象的完整代码如下所示:
package com.custom.authentication.server.authentication;

import org.springframework.security.authentication.AbstractAuthenticationToken;
import org.springframework.security.core.GrantedAuthority;
import java.util.Collection;

/**
 * 自定义的用户名密码认证对象
 */
public class CustomUsernamePasswordAuthenticationToken extends AbstractAuthenticationToken {
    /**
     * 用户名
     */
    private final Object principal;

    /**
     * 密码
     */
    private Object credentials;

    /**
     * 创建未认证的用户名密码认证对象
     */
    public CustomUsernamePasswordAuthenticationToken(Object principal, Object credentials) {
        super((Collection)null);
        this.principal = principal;
        this.credentials = credentials;
        this.setAuthenticated(false);
    }

    /**
     * 创建已认证的用户密码认证对象
     */
    public CustomUsernamePasswordAuthenticationToken(Object principal, Object credentials, Collection<? extends GrantedAuthority> authorities) {
        super(authorities);
        this.principal = principal;
        this.credentials = credentials;
        super.setAuthenticated(true);
    }

    @Override
    public Object getCredentials() {
        return this.credentials;
    }

    @Override
    public Object getPrincipal() {
        return this.principal;
    }

    @Override
    public void setAuthenticated(boolean isAuthenticated) throws IllegalArgumentException {
        if (isAuthenticated) {
            throw new IllegalArgumentException("Cannot set this token to trusted - use constructor which takes a GrantedAuthority list instead");
        } else {
            super.setAuthenticated(false);
        }
    }

    @Override
    public void eraseCredentials() {
        super.eraseCredentials();
        this.credentials = null;
    }

}
注意:自定义的用户认证对象的使用请见2.9小节。
2.7 自定义用户认证成功处理器
用户认证成功处理器是在用户认证成功之后调用,主要是执行一些额外的操作(例如,操作Cookie、页面跳转等)。
自定义的用户认证成功处理器可以通过实现AuthenticationSuccessHandler接口,或者通过继承AbstractAuthenticationTargetUrlRequestHandler类及其子类来实现。本文自定义的用户认证成功处理器是通过继承AbstractAuthenticationTargetUrlRequestHandler的子类SavedRequestAwareAuthenticationSuccessHandler来实现的,完整代码如下所示:
package com.custom.authentication.server.authentication;
import com.custom.authentication.server.constant.ConfigConstant;
import com.fasterxml.jackson.databind.ObjectMapper;
import org.springframework.beans.factory.annotation.Autowired;
import org.springframework.security.core.Authentication;
import org.springframework.security.web.authentication.SavedRequestAwareAuthenticationSuccessHandler;
import org.springframework.stereotype.Component;
import javax.servlet.ServletException;
import javax.servlet.http.HttpServletRequest;
import javax.servlet.http.HttpServletResponse;
import java.io.IOException;
/**
* 自定义的用户认证成功处理器
*/
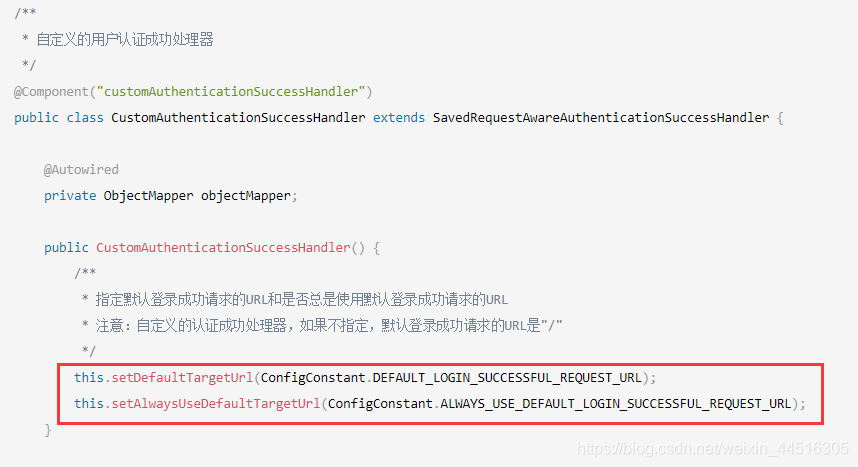
@Component("customAuthenticationSuccessHandler")
public class CustomAuthenticationSuccessHandler extends SavedRequestAwareAuthenticationSuccessHandler {
@Autowired
private ObjectMapper objectMapper;
public CustomAuthenticationSuccessHandler() {
/**
* 指定默认登录成功请求的URL和是否总是使用默认登录成功请求的URL
* 注意:自定义的认证成功处理器,如果不指定,默认登录成功请求的URL是"/"
*/
this.setDefaultTargetUrl(ConfigConstant.DEFAULT_LOGIN_SUCCESSFUL_REQUEST_URL);
this.setAlwaysUseDefaultTargetUrl(ConfigConstant.ALWAYS_USE_DEFAULT_LOGIN_SUCCESSFUL_REQUEST_URL);
}
@Override
public void onAuthenticationSuccess(HttpServletRequest request, HttpServletResponse response, Authentication authentication) throws ServletException, IOException {
/**
* 如果配置ConfigConstant.LOGIN_RESPONSE_TYPE="JSON",则返回JSON,否则使用页面跳转
*/
if("JSON".equalsIgnoreCase(ConfigConstant.LOGIN_RESPONSE_TYPE)) {
response.setContentType("application/json;charset=UTF-8");
response.getWriter().write(objectMapper.writeValueAsString(authentication));
} else {
super.onAuthenticationSuccess(request, response, authentication);
}
}
}
需要说明的是,如果自定义了用户认证成功处理器,则在Spring Security配置类中通过http.formlogin().defaultSuccessUrl(" URL")来指定的默认认证成功后请求的URL配置并不会对自定义的用户认证成功处理器有效,因为该配置只对Spring Security默认的用户认证成功处理器有效。要想使得自定义的用户认证成功之后自动请求指定的URL,则需要在自定义的用户认证成功处理器中通过设置defaultTargetUrl参数的值的方式来实现,如下图所示:
注意:自定义的用户认证成功处理器的使用请见2.9小节。
2.8 自定义用户认证失败处理器
用户认证失败处理器是在用户认证失败之后调用,主要是执行一些额外的操作(例如,操作Cookie、页面跳转等)。
自定义的用户认证失败处理器可以通过实现AuthenticationFailureHandler接口,或者通过继承AuthenticationFailureHandler接口的其它实现类来实现。本文自定义的用户认证失败处理器是通过继承AuthenticationFailureHandler接口的实现类SimpleUrlAuthenticationFailureHandler来实现的,完整代码如下所示:
package com.custom.authentication.server.authentication;

import com.custom.authentication.server.constant.ConfigConstant;
import com.fasterxml.jackson.databind.ObjectMapper;
import org.springframework.beans.factory.annotation.Autowired;
import org.springframework.http.HttpStatus;
import org.springframework.security.core.AuthenticationException;
import org.springframework.security.web.authentication.SimpleUrlAuthenticationFailureHandler;
import org.springframework.stereotype.Component;
import javax.servlet.ServletException;
import javax.servlet.http.HttpServletRequest;
import javax.servlet.http.HttpServletResponse;
import java.io.IOException;

/**
 * 自定义的用户认证失败处理器
 */
@Component("customAuthenticationFailureHandler")
public class CustomAuthenticationFailureHandler extends SimpleUrlAuthenticationFailureHandler {

    @Autowired
    private ObjectMapper objectMapper;

    @Override
    public void onAuthenticationFailure(HttpServletRequest request, HttpServletResponse response, AuthenticationException exception) throws IOException, ServletException {
        /**
         * 如果配置ConfigConstant.LOGIN_RESPONSE_TYPE="JSON",则返回JSON,否则使用页面跳转
         */
        if("JSON".equalsIgnoreCase(ConfigConstant.LOGIN_RESPONSE_TYPE)) {
            response.setStatus(HttpStatus.INTERNAL_SERVER_ERROR.value());
            response.setContentType("application/json;charset=UTF-8");
            response.getWriter().write(objectMapper.writeValueAsString(exception.getMessage()));
        } else {
            super.onAuthenticationFailure(request, response, exception);
        }
    }

}
注意:自定义的用户认证失败处理器的使用请见2.9小节。
2.9 自定义用户认证处理逻辑的应用
自定义的用户认证页面、退出功能、"记住我"功能的使用方法比较简单,分别按照2.1节、2.2节、2.3节中的实现即可。
自定义的用户认证拦截器、用户认证处理器、用户认证对象、认证成功处理器、认证失败处理器的使用方法却要稍微复杂,仅仅只是自定义实现了这些部分还不够,还要使这些自定义的实现生效才行。具体做法是:
- 通过继承SecurityConfigurerAdapter类实现一个配置类,并重写public void configure(HttpSecurity http)方法,在该方法中对自定义的用户认证拦截器进行设置,然后再将自定义的用户认证拦截器和处理器加入到过滤器链中特定的位置。
- 然后在Spring Security配置类中应用第1步实现的配置类。
本文实现的配置类的完整代码如下所示:
package com.custom.authentication.server.config;

import com.custom.authentication.server.authentication.CustomAuthenticationFailureHandler;
import com.custom.authentication.server.authentication.CustomAuthenticationSuccessHandler;
import com.custom.authentication.server.authentication.CustomUsernamePasswordAuthenticationFilter;
import com.custom.authentication.server.authentication.CustomUsernamePasswordAuthenticationProvider;
import org.springframework.beans.factory.annotation.Autowired;
import org.springframework.security.authentication.AuthenticationManager;
import org.springframework.security.config.annotation.SecurityConfigurerAdapter;
import org.springframework.security.config.annotation.web.builders.HttpSecurity;
import org.springframework.security.web.DefaultSecurityFilterChain;
import org.springframework.security.web.authentication.RememberMeServices;
import org.springframework.security.web.authentication.UsernamePasswordAuthenticationFilter;
import org.springframework.stereotype.Component;

/**
 * 自定义的用户名密码认证配置类
 */
@Component
public class CustomUsernamePasswordAuthenticationConfig extends SecurityConfigurerAdapter<DefaultSecurityFilterChain, HttpSecurity> {

    @Autowired
    CustomUsernamePasswordAuthenticationProvider customUsernamePasswordAuthenticationProvider;

    @Autowired
    CustomAuthenticationSuccessHandler customAuthenticationSuccessHandler;

    @Autowired
    CustomAuthenticationFailureHandler customAuthenticationFailureHandler;

    @Override
    public void configure(HttpSecurity http) throws Exception {
        CustomUsernamePasswordAuthenticationFilter authenticationFilter = new CustomUsernamePasswordAuthenticationFilter();

        /**
         * 自定义用户认证处理逻辑时,需要指定AuthenticationManager,否则无法认证
         */
        authenticationFilter.setAuthenticationManager(http.getSharedObject(AuthenticationManager.class));
        /**
         * 自定义用户认证处理逻辑时,需要指定RememberMeServices,否则自定义用户认证的"记住我"功能异常
         */
        authenticationFilter.setRememberMeServices(http.getSharedObject(RememberMeServices.class));

        /**
         * 指定自定义的认证成功和失败的处理器
         */
        authenticationFilter.setAuthenticationSuccessHandler(customAuthenticationSuccessHandler);
        authenticationFilter.setAuthenticationFailureHandler(customAuthenticationFailureHandler);

        /**
         * 把自定义的用户名密码认证过滤器和处理器添加到UsernamePasswordAuthenticationFilter过滤器之前
         */
        http
            .authenticationProvider(customUsernamePasswordAuthenticationProvider)
            .addFilterBefore(authenticationFilter, UsernamePasswordAuthenticationFilter.class);
    }

}
注意:必须通过setAuthenticationManager()方法给自定义的用户认证拦截器注入一个AuthenticationManager对象才能调用相应的用户认证处理器进行认证。必须通过setRememberMeServices()方法给自定义的用户认证拦截器注入一个RememberMeServices对象才能在自定义的用户认证中使用"记住我"功能。
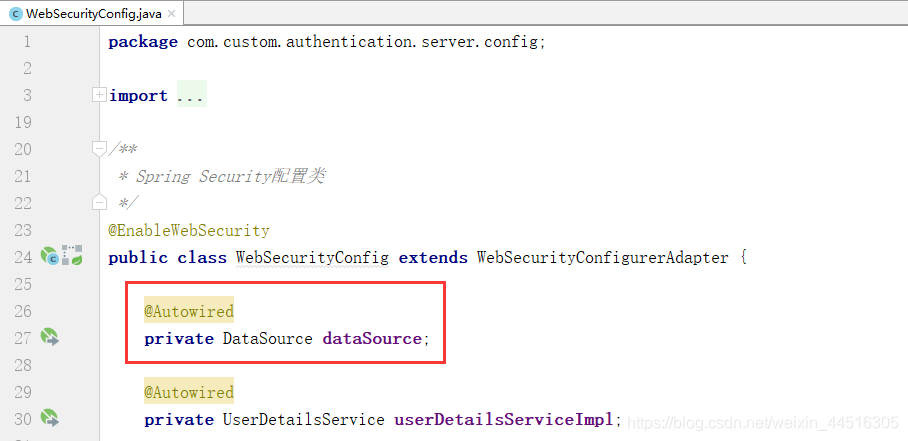
本文的Spring Security配置类的完整代码如下所示:
package com.custom.authentication.server.config;
import com.custom.authentication.server.constant.ConfigConstant;
import org.springframework.beans.factory.annotation.Autowired;
import org.springframework.context.annotation.Bean;
import org.springframework.security.config.annotation.authentication.builders.AuthenticationManagerBuilder;
import org.springframework.security.config.annotation.web.builders.HttpSecurity;
import org.springframework.security.config.annotation.web.configuration.EnableWebSecurity;
import org.springframework.security.config.annotation.web.configuration.WebSecurityConfigurerAdapter;
import org.springframework.security.core.userdetails.UserDetailsService;
import org.springframework.security.crypto.bcrypt.BCryptPasswordEncoder;
import org.springframework.security.crypto.password.PasswordEncoder;
import org.springframework.security.web.authentication.rememberme.JdbcTokenRepositoryImpl;
import org.springframework.security.web.authentication.rememberme.PersistentTokenRepository;
import org.springframework.security.web.util.matcher.AntPathRequestMatcher;
import org.springframework.security.web.util.matcher.OrRequestMatcher;
import javax.sql.DataSource;
/**
* Spring Security配置类
*/
@EnableWebSecurity
public class WebSecurityConfig extends WebSecurityConfigurerAdapter {
@Autowired
private DataSource dataSource;
@Autowired
private UserDetailsService userDetailsServiceImpl;
@Autowired
private CustomUsernamePasswordAuthenticationConfig customUsernamePasswordAuthenticationConfig;
/**
* 用户认证配置
*/
@Override
protected void configure(AuthenticationManagerBuilder auth) throws Exception {
/**
* 指定用户认证时,默认从哪里获取认证用户信息
*/
auth.userDetailsService(userDetailsServiceImpl);
}
/**
* Http安全配置
*/
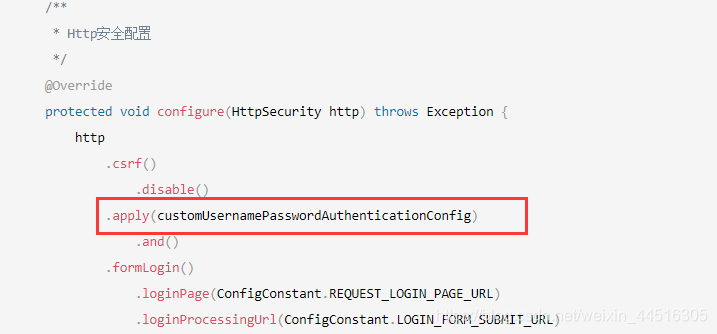
@Override
protected void configure(HttpSecurity http) throws Exception {
http
.csrf()
.disable()
.apply(customUsernamePasswordAuthenticationConfig)
.and()
.formLogin()
.loginPage(ConfigConstant.REQUEST_LOGIN_PAGE_URL)
.loginProcessingUrl(ConfigConstant.LOGIN_FORM_SUBMIT_URL)
.defaultSuccessUrl(ConfigConstant.DEFAULT_LOGIN_SUCCESSFUL_REQUEST_URL, ConfigConstant.ALWAYS_USE_DEFAULT_LOGIN_SUCCESSFUL_REQUEST_URL)
.permitAll()
.and()
.logout()
.logoutUrl(ConfigConstant.LOGOUT_URL)
.logoutSuccessUrl(ConfigConstant.LOGOUT_SUCCESSFUL_REQUEST_URL)
.logoutRequestMatcher(getLogoutRequestMatchers())
.permitAll()
.and()
.rememberMe()
.tokenRepository(getPersistentTokenRepository())
.tokenValiditySeconds(ConfigConstant.REMEMBER_ME_SECOND)
.and()
.authorizeRequests()
.antMatchers(ConfigConstant.PERMIT_ALL_REQUEST_URL_ARRAY)
.permitAll()
.anyRequest()
.authenticated();
}
/**
* 密码加密器
*/
@Bean
public PasswordEncoder passwordEncoder() {
/**
* BCryptPasswordEncoder:相同的密码明文每次生成的密文都不同,安全性更高
*/
return new BCryptPasswordEncoder();
}
/**
* 指定保存用户登录“记住我”功能的Token的方法:
* 默认是使用InMemoryTokenRepositoryImpl将Token放在内存中,
* 如果使用JdbcTokenRepositoryImpl,会创建persistent_logins数据库表,并将Token保存到该表中。
*/
@Bean
public PersistentTokenRepository getPersistentTokenRepository() {
JdbcTokenRepositoryImpl jdbcTokenRepository = new JdbcTokenRepositoryImpl();
jdbcTokenRepository.setDataSource(dataSource);
/**
* 系统启动时自动创建表,只需要在第一次启动系统时创建即可,因此这行代码只在需要创建表时才启用
*/
// jdbcTokenRepository.setCreateTableOnStartup(true);
return jdbcTokenRepository;
}
/**
* 自定义退出登录的RequestMatcher
*/
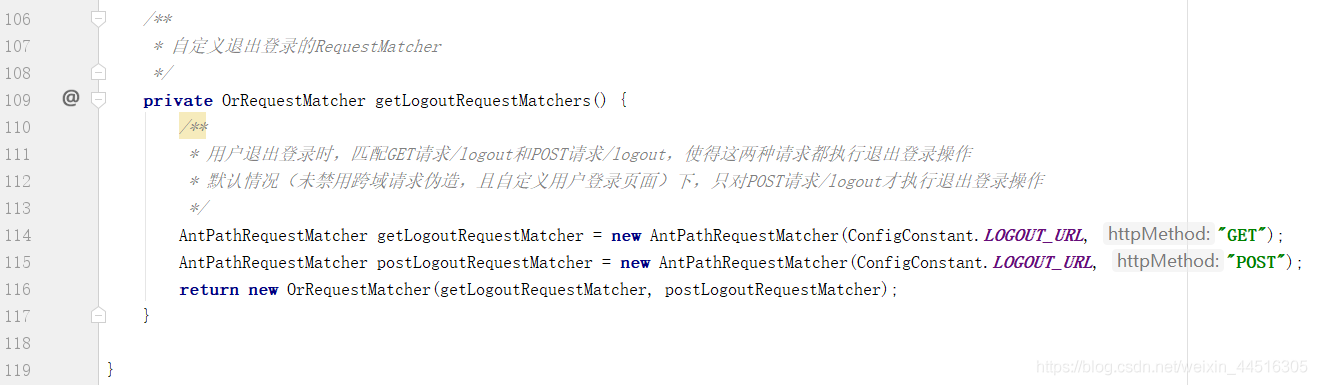
private OrRequestMatcher getLogoutRequestMatchers() {
/**
* 用户退出登录时,匹配GET请求/logout和POST请求/logout,使得这两种请求都执行退出登录操作
* 默认情况(未禁用跨域请求伪造,且自定义用户登录页面)下,只对POST请求/logout才执行退出登录操作
*/
AntPathRequestMatcher getLogoutRequestMatcher = new AntPathRequestMatcher(ConfigConstant.LOGOUT_URL, "GET");
AntPathRequestMatcher postLogoutRequestMatcher = new AntPathRequestMatcher(ConfigConstant.LOGOUT_URL, "POST");
return new OrRequestMatcher(getLogoutRequestMatcher, postLogoutRequestMatcher);
}
}
其中应用第1步实现的配置类的代码如下图中所示:
3 权限控制相关的自定义实现
Spring Security用户认证和权限控制(默认实现)这篇文章中介绍了方法级别的权限控制,而本文要介绍的是URL级别的权限控制。
3.1 自定义权限数据获取类
Spring Security的方法级别的权限控制的默认实现是把权限信息保存在内存中,而基于URL级别的权限控制的实际应用中通常是把权限信息保存在数据库中。因此,URL级别的权限控制通常都需要我们自己实现从数据库中获取权限信息。
自定义的权限数据获取类可以通过实现FilterInvocationSecurityMetadataSource 接口来实现。本文自定义的权限数据获取类的完整代码如下所示:
package com.custom.authentication.server.permission;

import org.springframework.security.access.ConfigAttribute;
import org.springframework.security.access.SecurityConfig;
import org.springframework.security.web.FilterInvocation;
import org.springframework.security.web.access.intercept.FilterInvocationSecurityMetadataSource;
import org.springframework.security.web.util.matcher.AntPathRequestMatcher;
import org.springframework.stereotype.Component;
import javax.servlet.http.HttpServletRequest;
import java.util.ArrayList;
import java.util.Collection;
import java.util.HashMap;
import java.util.Iterator;
import java.util.List;

/**
 * 自定义的资源(url)权限(角色)数据获取类
 */
@Component("customFilterInvocationSecurityMetadataSource")
public class CustomFilterInvocationSecurityMetadataSource implements FilterInvocationSecurityMetadataSource {

    /**
     * 每个资源(url)所需要的权限(角色)集合
     */
    private static HashMap<String, Collection<ConfigAttribute>> map =null;

    /**
     * 获取每个资源(url)所需要的权限(角色)集合
     * 这里应该从数据库中动态查询,这里为了方便而直接创建
     */
    private void getResourcePermission(){
        map = new HashMap<>();

        /**
         * 创建两个权限:ROLE_ADMIN 和 ROLE_EMPLOYEE
         */
        ConfigAttribute adminRole = new SecurityConfig("ROLE_ADMIN");
        ConfigAttribute employeeRole = new SecurityConfig("ROLE_EMPLOYEE");

        /**
         * 创建两个权限集合
         */
        List<ConfigAttribute> adminUrlRoles = new ArrayList<>();
        adminUrlRoles.add(adminRole);
        List<ConfigAttribute> employeeUrlRoles = new ArrayList<>();
        employeeUrlRoles.add(employeeRole);

        /**
         * 设置资源(url)所需要的权限(角色)集合
         */
        map.put("/toAdmin", adminUrlRoles);
        map.put("/toEmployee", employeeUrlRoles);
        map.put("/toUser", null);
        map.put("/toAbout", null);
        map.put("/toHome", null);
        map.put("/getPrincipal", null);
        map.put("/getUserDetails", null);
    }

    /**
     * 获取用户请求的某个具体的资源(url)所需要的权限(角色)集合
     * @param object 包含了用户请求的request信息
     */
    @Override
    public Collection<ConfigAttribute> getAttributes(Object object) throws IllegalArgumentException {
        if(map ==null) {
            getResourcePermission();
        }
        HttpServletRequest request = ((FilterInvocation) object).getHttpRequest();

        /**
         * 遍历每个资源(url),如果与用户请求的资源(url)匹配,则返回该资源(url)所需要的权限(角色)集合,
         * 如果全都不匹配,则表示用户请求的资源(url)不需要权限(角色)即可访问
         */
        Iterator<String> iter = map.keySet().iterator();
        while(iter.hasNext()) {
            String url = iter.next();
            if(new AntPathRequestMatcher(url).matches(request)) {
                return map.get(url);
            }
        }
        return null;
    }

    @Override
    public Collection<ConfigAttribute> getAllConfigAttributes() {
        return null;
    }

    @Override
    public boolean supports(Class<?> clazz) {
        return true;
    }
}
注意:自定义的权限数据获取类的使用请见3.3小节。
3.2 自定义权限控制管理器
权限控制管理器主要是比对用户所拥有的权限和用户请求的URL或方法所需要的权限,以决定是否允许用户执行请求,如果比对成功,则允许,否则拒绝。
自定义的权限控制管理器主要是要实现权限比对的处理逻辑,可以通过实现AccessDecisionManager接口来实现。本文自定义的权限控制管理器的完整代码如下所示:
package com.custom.authentication.server.permission;

import org.springframework.security.access.AccessDecisionManager;
import org.springframework.security.access.AccessDeniedException;
import org.springframework.security.access.ConfigAttribute;
import org.springframework.security.authentication.InsufficientAuthenticationException;
import org.springframework.security.core.Authentication;
import org.springframework.security.core.GrantedAuthority;
import org.springframework.stereotype.Component;
import java.util.Collection;
import java.util.Iterator;

/**
 * 自定义的权限控制管理器
 */
@Component("customAccessDecisionManager")
public class CustomAccessDecisionManager implements AccessDecisionManager {

    /**
     * 判断是否有权限
     * @param auth  包含了UserDetails用户信息
     * @param object  包含了request请求信息
     * @param configAttributes  由CustomFilterInvocationSecurityMetadataSource.getAttributes(object)返回的请求的资源(url)所需要的权限(角色)集合
     */
    @Override
    public void decide(Authentication auth, Object object, Collection<ConfigAttribute> configAttributes) throws AccessDeniedException, InsufficientAuthenticationException {
        /**
         * 如果请求的资源不需要权限,则直接放行
         */
        if(configAttributes == null || configAttributes.size() <= 0) {
            return;
        }
        /**
         * 判断用户所拥有的权限是否是资源所需要的权限之一,如果是则放行,否则拦截
         */
        Iterator<ConfigAttribute> iter = configAttributes.iterator();
        while(iter.hasNext()) {
            String needRole = iter.next().getAttribute();
            for(GrantedAuthority grantRole : auth.getAuthorities()) {
                if(needRole.trim().equals(grantRole.getAuthority().trim())) {
                    return;
                }
            }
        }
        throw new AccessDeniedException("no privilege");
    }

    @Override
    public boolean supports(ConfigAttribute attribute) {
        return true;
    }

    @Override
    public boolean supports(Class<?> clazz) {
        return true;
    }
}
注意:自定义的权限控制管理器的使用请见3.3小节。
3.3 自定义权限控制处理逻辑的应用
启用方法级别的权限控制,需要在主启动类上使用@EnableGlobalMethodSecurity()注解,并在请求方法的入口处使用类似于@PreAuthorize(“hasRole(‘ROLE_ADMIN’)”)的注解指定方法执行所需要的权限。
自定义的URL级别的权限控制的启用方法与方法级别的权限控制的启用方法不太一样,而是通过把自定义的权限数据获取类和权限控制管理器添加到自定义的过滤器中实现的,具体做法是:
- 自定义一个既继承了AbstractSecurityInterceptor类又实现了Filter接口的过滤器,并重写和实现其中的方法。
- 把自定义的权限数据获取类的对象注入到自定义的过滤器中,并且要能够通过调用重写的public SecurityMetadataSource obtainSecurityMetadataSource()方法即可获取到自定义的权限数据获取类的对象。
- 以构造方法的形式把自定义的权限控制管理器注入到自定义的过滤器中。
本文实现的自定义过滤器的完整代码如下所示:
package com.custom.authentication.server.permission;

import org.springframework.beans.factory.annotation.Autowired;
import org.springframework.security.access.SecurityMetadataSource;
import org.springframework.security.access.intercept.AbstractSecurityInterceptor;
import org.springframework.security.access.intercept.InterceptorStatusToken;
import org.springframework.security.web.FilterInvocation;
import org.springframework.security.web.access.intercept.FilterInvocationSecurityMetadataSource;
import org.springframework.stereotype.Component;
import javax.servlet.Filter;
import javax.servlet.FilterChain;
import javax.servlet.FilterConfig;
import javax.servlet.ServletException;
import javax.servlet.ServletRequest;
import javax.servlet.ServletResponse;
import java.io.IOException;

/**
 * 自定义的权限验证过滤器
 */
@Component
public class CustomFilterSecurityInterceptor extends AbstractSecurityInterceptor implements Filter {

    /**
     * 注入自定义的资源(url)权限(角色)获取类
     */
    @Autowired
    private FilterInvocationSecurityMetadataSource customFilterInvocationSecurityMetadataSource;

    /**
     * 注入自定义的权限验证管理器
     */
    @Autowired
    public void setAccessDecisionManager(CustomAccessDecisionManager customAccessDecisionManager) {
        super.setAccessDecisionManager(customAccessDecisionManager);
    }

    @Override
    public void init(FilterConfig filterConfig) throws ServletException {}

    @Override
    public void doFilter(ServletRequest request, ServletResponse response, FilterChain chain) throws IOException, ServletException {
        FilterInvocation fi = new FilterInvocation(request, response, chain);
        InterceptorStatusToken token = super.beforeInvocation(fi);
        try {
            /**
             * 执行下一个拦截器
             */
            fi.getChain().doFilter(fi.getRequest(), fi.getResponse());
        } finally {
            super.afterInvocation(token, null);
        }
    }

    @Override
    public void destroy() {}

    @Override
    public Class<?> getSecureObjectClass() {
        return FilterInvocation.class;
    }

    @Override
    public SecurityMetadataSource obtainSecurityMetadataSource() {
        return this.customFilterInvocationSecurityMetadataSource;
    }
}
3 总结
本文对于使用Spring Security实现用户认证和权限控制功能当中可能需要个性化的部分进行了介绍,同时也对自定义实现中需要注意的一些小细节进行了特别说明。关于自定义实现的测试方法和Spring Security用户认证和权限控制(默认实现)这篇文章中的一样,因此就不过多重复。关于授权服务器、资源服务器的内容可以查阅以下几篇文章:
OAuth2授权服务器和四种授权方式 这篇文章介绍了授权服务器和四种授权方式的配置与使用方法。
OAuth2资源服务器 这篇文章介绍了基于方法级别的权限控制的资源服务器的配置与使用方法。
如果觉得本文对您有帮助,请关注博主的微信公众号,会经常分享一些Java和大数据方面的技术案例!


Authing 是一款以开发者为中心的全场景身份云产品,集成了所有主流身份认证协议,为企业和开发者提供完善安全的用户认证和访问管理服务
更多推荐


 30
30 0
0- 0


 已为社区贡献1条内容

所有评论(0)